
A full kitchen renovation is a significant undertaking, weeks of disruption, a substantial budget, and the kind of decision-making marathon that most homeowners only want to run once. But the kitchen that felt current five years ago and now feels slightly off, the one where the cabinetry is solid and the tile is still right but something in the room reads as dated, that kitchen does not necessarily need a renovation. It may need new hardware.
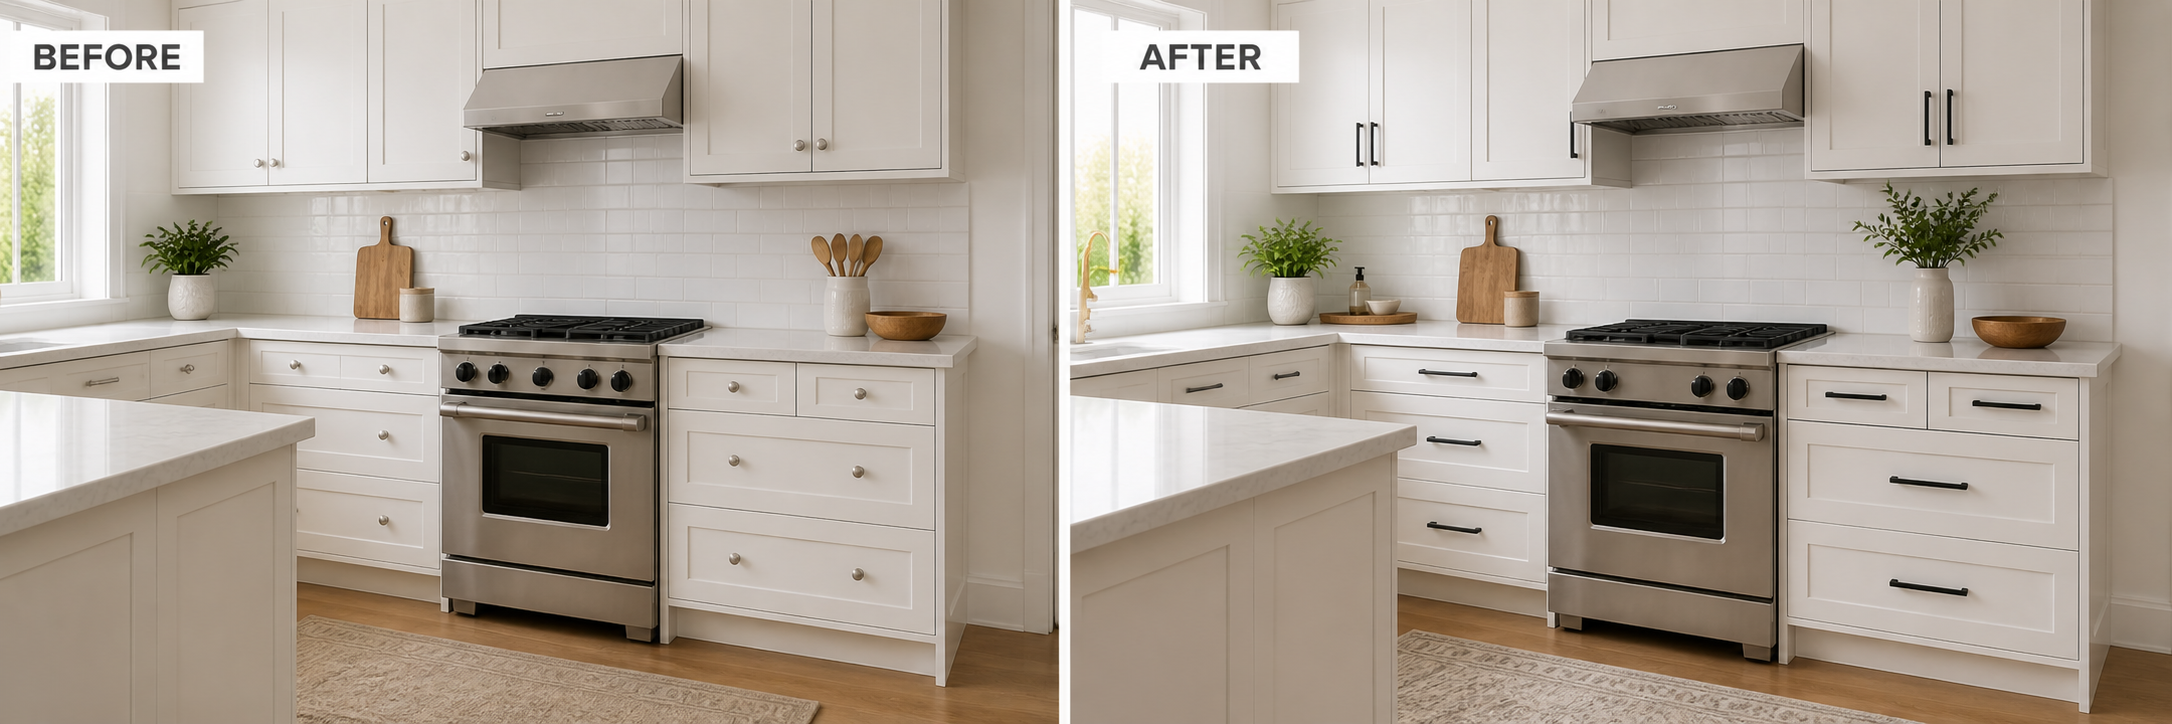
Cabinet pull replacement is the highest-impact, lowest-cost update available in a kitchen that is structurally sound. The right pulls can shift a traditional kitchen toward transitional, move a transitional kitchen toward contemporary, introduce a finish that coordinates better with updated fixtures or a recently retiled backsplash, and simply make a room that was assembled feel designed. The investment is a fraction of renovation cost. The time required is a single afternoon. The result, when the hardware choice is right, is a kitchen that looks as if someone paid careful attention to every detail, because now they have.
This guide covers the complete pull refresh process: evaluating whether a hardware update will achieve the update you want, choosing a new finish and profile that works with the existing kitchen, handling the hole situation when new pulls do not align with old ones, and extending the update across the bathroom and laundry room for whole-home impact. All pull options referenced are available in the Jeffrey Alexander cabinet pulls collection at Tile Choices.
First: Evaluate What the Hardware Update Can and Cannot Do
Cabinet pull replacement is transformative within certain limits, and understanding those limits before choosing new hardware prevents disappointment and produces a more honest assessment of what the update will achieve.
Hardware replacement works best when the cabinetry itself, the door style, the color, the condition, is not the primary source of the kitchen's dated feeling. A Shaker cabinet door in white paint with dated oil-rubbed bronze bar pulls will look significantly more current with new Brushed Gold or Matte Black pulls. The same Shaker door style in genuinely worn or discolored paint will not be meaningfully improved by hardware alone, the paint needs addressing first.
Hardware replacement is also most effective when the tile and countertop are staying in place and the new hardware needs to work with those existing surfaces. If the backsplash tile is warm cream subway and the countertops are warm beige granite, there is a clear palette direction for new hardware, warm finishes in Brushed Gold or Satin Bronze will work, cool finishes in Matte Black or Polished Chrome will not. The existing surfaces are fixed constraints, and the new hardware must serve them. The hardware finish and tile pairing guide covers this evaluation in detail for every major tile type and palette combination.
Step One: Identify What Is Working and What Is Not
Before selecting new hardware, be specific about what the current hardware is doing wrong. This sounds obvious but the answer determines what the new hardware needs to accomplish, and prevents making a lateral change that feels different but does not actually improve the room.
The most common hardware problems in kitchens that need refreshing are: a finish that no longer coordinates with updated plumbing fixtures or a recently retiled backsplash; a profile that reads as belonging to a design era the homeowner has moved past, small thin oil-rubbed bronze bar pulls from the early 2000s, polished brass cup pulls from the 1990s; hardware that was functional but never quite right for the cabinet style; or pulls that have physically worn, loose screws, worn finish at contact points, wobble at the mount. Each problem has a different solution, and the solution shapes the hardware selection differently.
A finish coordination problem is solved by choosing a new finish that works with the fixed elements in the room, typically the tile and the plumbing fixtures. A profile era problem is solved by choosing a new profile direction suited to the cabinet door style. A style mismatch is solved by aligning the new pull with the cabinet's actual design language. A physical wear problem is solved by any quality replacement from the Jeffrey Alexander collection, the solid zinc construction that makes Jeffrey Alexander pulls outlast lower-quality alternatives means the new hardware will not develop the same wear pattern that prompted the replacement.
Step Two: Choose the Right Finish for the Existing Kitchen
Finish selection for a refresh is more constrained than finish selection for new construction, you are working within a palette that already exists. The tile, countertops, cabinetry color, and plumbing fixtures are all fixed. The new hardware finish needs to work within that existing palette, not establish a competing one.
Reading the Existing Palette
Start by identifying the dominant tone of the existing kitchen, warm or cool. Warm kitchens have cream or beige tile, warm-toned countertops, wood cabinetry or painted cabinetry in warm white or linen, and plumbing fixtures in brass, bronze, or warm chrome. Cool kitchens have white or gray tile, cool-toned countertops in white quartz or gray marble, painted cabinetry in bright white or cool gray, and plumbing fixtures in polished chrome or polished nickel.
In a warm kitchen, the hardware refresh should stay in the warm metal family: Brushed Gold, Satin Bronze, Brushed Oil Rubbed Bronze, or Lightly Distressed Antique Brass. In a cool kitchen, the refresh should stay in the cool or neutral family: Satin Nickel for the most versatile neutral update, Matte Black for the most dramatic contrast shift, Polished Chrome for a bright contemporary move. For a detailed palette-by-palette breakdown, the finish and tile pairing guide covers every combination in the level of detail that a refresh decision requires.
The Most Common Refresh Finish Moves
Some finish transitions are well-established because they work reliably across a wide range of existing kitchen palettes. Oil-rubbed bronze to Brushed Gold is the most common current refresh move, it updates the hardware from a finish that reads as early 2000s to one that reads as current without requiring any other changes in the kitchen. Polished brass to Satin Nickel or Brushed Gold is the refresh move for kitchens with 1980s and 1990s hardware. Satin Nickel to Matte Black is the most dramatic finish refresh available, it transforms the visual temperature of the hardware from neutral to bold contrast and works best in kitchens with white or light gray cabinetry and tile. Polished Chrome to Polished Nickel is a subtle warm-up move for contemporary kitchens where the hardware needs only a slight adjustment to feel more current.
Step Three: Choose the Right Pull Profile for the Existing Cabinet Style
A hardware refresh is also an opportunity to correct a profile mismatch that existed from the original installation. If the kitchen has flat-panel doors with ornate traditional pulls, or Shaker doors with undersized bar pulls that never quite suited the door, the refresh can fix that mismatch simultaneously with the finish update.
For flat-panel and slab cabinet doors, the refresh pull should be a clean bar pull or minimal-profile pull, the bar pulls collection is the most direct resource for contemporary profile options. For Shaker doors moving in a more contemporary direction, a square-bar or round-bar pull in Matte Black or Brushed Gold from a collection like Sutton or Alvar is the most efficient profile update. For Shaker doors staying warm and transitional, a slightly shaped pull in Brushed Gold or Satin Bronze suits the door's balanced quality without overpowering it. For raised-panel and traditional doors, shaped pulls with some architectural detail from transitional collections like Belcastel 1 or Hayworth suit the door's own relief character better than a pure bar pull would.
For a comprehensive guide to which pull profile belongs on which cabinet door style and drawer application, the cabinet hardware type guide covers every combination with specific Jeffrey Alexander collection recommendations.
Step Four: Handle the Hole Situation
The practical challenge of a pull refresh is the existing hole positions. If the new pull is the same center-to-center size as the old one, installation is straightforward, remove the old pulls, install the new ones, done. If the new center-to-center is different, new holes need to be drilled and the old ones need to be addressed.
Filling Existing Holes
Filling old cabinet holes is a straightforward process that produces invisible results in painted cabinetry. The materials needed are wood filler or wood putty, fine-grit sandpaper (220 grit), and touch-up paint that matches the cabinet finish. Apply the filler to the hole, slightly overfilling to account for shrinkage as it dries. Allow full cure time, typically four to six hours for most wood fillers, longer in humid environments. Sand the filled area flush with the door face using 220-grit paper. Touch up with matching paint, allow to dry, and the old hole is invisible. The new hole can then be drilled at the correct center-to-center position for the new pull.
In stained wood cabinetry, filling is slightly more involved because the filler needs to match the wood tone and accept stain similarly to the surrounding wood. Stainable wood filler is available specifically for this application. In laminate cabinetry, filling with a color-matched laminate repair compound produces the cleanest result. If filling feels beyond the scope of a DIY refresh, a handyman or cabinet installer can complete the filling and touch-up in an hour or two per kitchen.
Using Backplates to Cover Old Holes
In kitchens where the cabinet finish makes filling and touch-up difficult, high-gloss paint that shows any surface variation, complex stained grain patterns, a backplate is the most practical solution. Jeffrey Alexander offers coordinating backplates in matching finishes for most of its major collections. The backplate mounts between the pull and the door face, covering the old holes while the new pull mounts through it at the correct center-to-center position. The result is a clean installation with a decorative plate visible behind the pull — a look that reads as intentional in transitional and traditional kitchens and still resolved in contemporary ones. Contact the Tile Choices team at sales@tilechoices.com to confirm backplate availability for specific collections before ordering.
Step Five: Size the New Pulls Correctly Across the Full Kitchen
A common refresh mistake is replacing like for like on size even when the existing pull size was never quite right for the drawer width. The refresh is an opportunity to correct proportional issues at the same time as the finish update, if existing 96mm pulls looked undersized on wide island drawers, now is the time to move those drawers to 160mm or 192mm while keeping 96mm on the standard-width drawers.
For a complete reference on center-to-center sizing across every standard drawer width, the cabinet pull sizing guide covers the full measurement process, the one-third rule, and how to handle non-standard hole spacing situations. For the kitchen refresh specifically, the most important sizing rule is this: when replacing pulls on wide drawers, 18 inches or wider, that currently carry undersized hardware, scale up. The larger pull will require new drilling and filling, but the proportional improvement justifies the additional work.
Extending the Refresh to Bathroom and Laundry
A kitchen hardware refresh is most impactful when it extends to the other hardware-bearing rooms in the home, bathrooms and laundry room, in the same collection and finish. A home where the kitchen pulls are updated to Brushed Gold but the bathroom vanity still carries dated oil-rubbed bronze knobs reads as a half-finished refresh. Doing the full home in one project produces the whole-home design coherence that makes the investment feel as significant as it is.
Bathroom vanity drawers and doors carry the same Jeffrey Alexander collections as the kitchen, the same finish in the same collection ties kitchen and bathroom hardware together without requiring identical pull profiles. A 96mm pull on bathroom vanity drawers and a coordinating cabinet knob on vanity doors in the same collection and finish is the standard bathroom approach. Coordinate the finish with the bathroom's own tile palette, the bathroom tile collection and the cohesive design guide cover bathroom-specific finish and tile coordination. Laundry room hardware follows the same logic, same collection, same finish, sized appropriately for the cabinet doors and drawer fronts present.


