
More than half of American homeowners update their kitchens every decade, yet many struggle to create a backsplash that feels both stylish and practical. Choosing the right glass subway tile is not just about looks. The right tile can bring brighter light, easier maintenance, and a fresh sense of space to your kitchen. This guide uncovers what sets glass subway tiles apart and how they help your next renovation truly reflect your American style.
Table of Contents
- 1. Why Glass Subway Tiles Add Style to Your Kitchen
- 2. Choosing the Right Tile Color for Your Space
- 3. Measuring and Planning Your Backsplash Area
- 4. Preparing Your Wall for Tile Installation
- 5. Best Installation Practices for Glass Subway Tiles
- 6. Cleaning and Maintenance Tips for Lasting Shine
- 7. Budgeting Strategies for a Stylish Kitchen Makeover
Quick Summary
| Key Message | Explanation |
|---|---|
| 1. Utilize the Luminous Qualities | Glass subway tiles reflect light, making kitchens feel brighter and more spacious, enhancing overall ambiance. |
| 2. Choose Colors Wisely | Select tile colors that harmonize with existing elements; neutral tones provide versatility, while bold colors add character. |
| 3. Measure Accurately Before Purchase | Precise measurements prevent costly mistakes and ensure that enough tiles are bought without excess waste. |
| 4. Prepare the Wall Thoroughly | Proper wall preparation is crucial for a successful install; cleaning and leveling help achieve a professional finish. |
| 5. Implement Cleaning Best Practices | Regular maintenance with gentle products keeps glass tiles shiny; use microfiber cloths to avoid scratches and maintain appeal. |
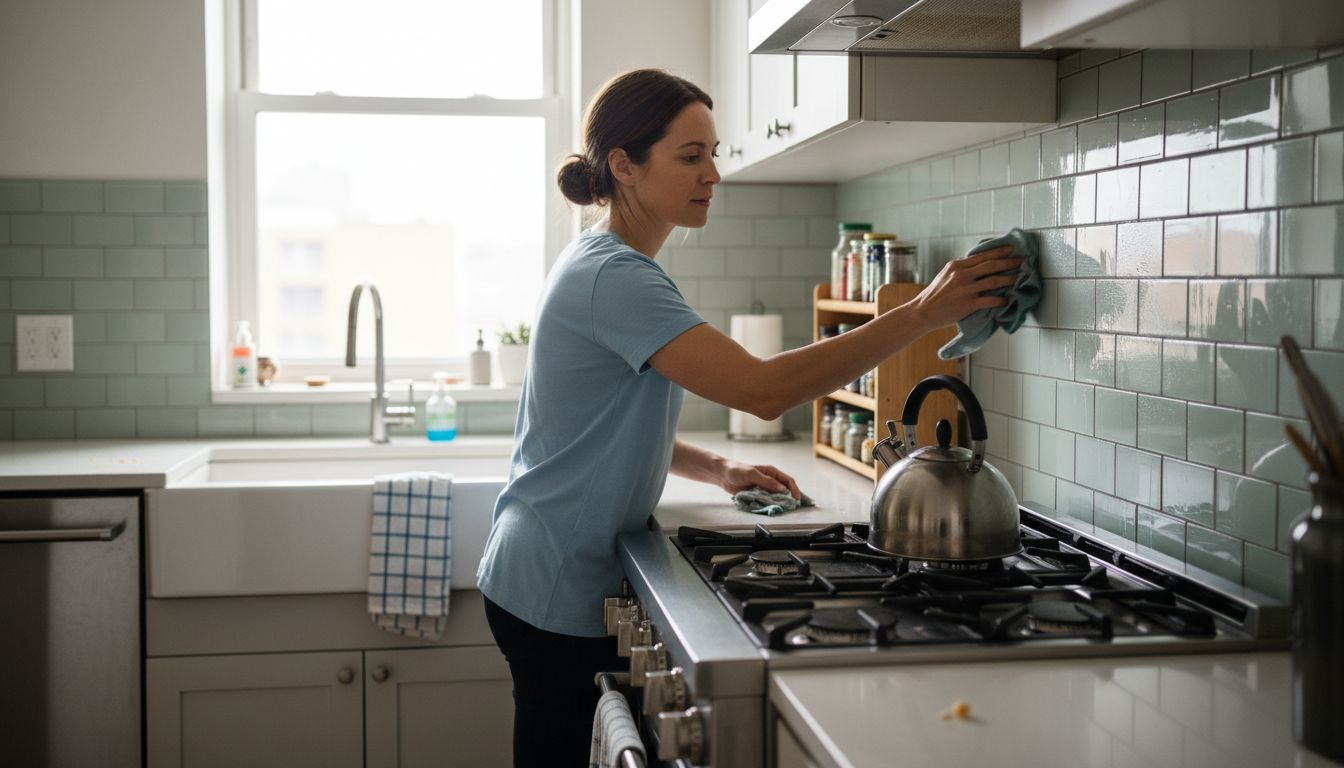
1. Why Glass Subway Tiles Add Style to Your Kitchen
Glass subway tiles are the ultimate game changer for kitchen backsplashes. These sleek, reflective surfaces transform ordinary kitchen walls into sophisticated design statements that catch and amplify natural light.
The magic of glass subway tiles lies in their unique ability to create visual depth and brightness. Unlike traditional ceramic or porcelain tiles, glass subway tiles offer a luminous quality that instantly modernizes your kitchen space. Their smooth, glossy surfaces reflect light in ways that make even smaller kitchens feel more open and spacious.
What sets glass subway tiles apart is their incredible versatility. Whether your kitchen design leans modern, contemporary, or transitional, these tiles adapt seamlessly. They come in a stunning array of colors from soft neutrals to bold jewel tones, allowing homeowners to personalize their backsplash without compromising on style or functionality.
Beyond aesthetics, glass subway tiles are remarkably practical. They are non porous, which means they resist stains, moisture, and bacterial growth far more effectively than traditional tile materials. Cleaning becomes a breeze with their smooth surfaces that wipe down quickly and maintain their pristine appearance with minimal effort.
Design Flexibility: Glass subway tiles work brilliantly in multiple installation patterns. From classic horizontal layouts to herringbone designs, chevron arrangements, or vertical stacking, these tiles offer endless design possibilities that keep your kitchen looking fresh and intentional.
Pro Tip: Select glass subway tiles with a subtle hint of color or texture to create visual interest without overwhelming your kitchen’s existing design palette.
2. Choosing the Right Tile Color for Your Space
Selecting the perfect glass subway tile color is a critical design decision that can dramatically transform your kitchen’s aesthetic and mood. Your tile choice serves as a visual anchor that ties together your entire kitchen design.
Color selection goes far beyond personal preference. Understanding color psychology and how different hues interact with kitchen elements will help you create a harmonious and inviting space. Think of your backsplash as an artistic canvas that reflects your kitchen’s personality and complements existing surfaces.
When choosing a glass subway tile color, start by examining your kitchen’s existing color palette. Look closely at your countertops, cabinetry, and flooring. Neutral tones like soft whites, light grays, or warm beiges offer maximum versatility and create a clean, timeless backdrop. Alternatively, bold colors can serve as a striking focal point that adds character and energy to your kitchen.
Practical considerations are equally important. Lighter colored glass subway tiles will reflect more light, making smaller kitchens feel more spacious and bright. Darker or more saturated tones can create depth and drama but might make compact spaces feel more confined.
Color Coordination Strategies:
- Match tile color to secondary kitchen accent colors
- Select tiles that complement your countertop material
- Consider the amount of natural light in your kitchen
- Test tile samples in your actual kitchen lighting
Pro Tip: Always collect multiple tile samples and view them in your kitchen’s actual lighting conditions at different times of day to ensure the perfect color match.
3. Measuring and Planning Your Backsplash Area
Measuring your kitchen backsplash area accurately is the critical first step in creating a stunning glass subway tile installation. Precision here prevents costly mistakes and ensures a professional looking result.
Before purchasing any tiles, you need a comprehensive measurement strategy. Detailed planning helps homeowners avoid common tile installation pitfalls and ensures a seamless design execution.
Measurement Tools You Will Need:
- Measuring tape
- Pencil and notepad
- Level
- Calculator
Start by measuring the total width of your backsplash area from one end of the countertop to the other. Next, determine the height from the countertop to the bottom of your kitchen cabinets. Remember to measure each section separately if you have interruptions like windows, outlets, or appliances.
Crucial Measurement Tips:
- Measure twice to confirm accuracy
- Account for electrical outlets and switches
- Add 10% extra tile for potential cuts and replacements
- Consider tile size when calculating total square footage
When calculating your total tile requirement, divide your total square footage by the square footage of a single tile. This ensures you purchase the correct amount without overbuying or running short during installation.
Pro Tip: Create a simple sketch of your backsplash area with measurements noted to help visualize the final design and share accurate information with tile professionals.
4. Preparing Your Wall for Tile Installation
Preparing your wall properly is the foundation of a flawless glass subway tile backsplash installation. Skipping this crucial step can lead to uneven tiles, premature failure, and an unprofessional appearance.
Understanding the nuances of wall preparation is essential for achieving a stunning and long lasting backsplash. Think of wall preparation like creating a perfect canvas before painting a masterpiece.
Key Wall Preparation Steps:
- Remove existing backsplash completely
- Clean surface thoroughly
- Repair any wall imperfections
- Sand rough areas
- Check wall levelness
Start by removing any existing backsplash material. This might involve carefully chipping away old tiles or scraping off wallpaper. Inspect the wall underneath for damage such as cracks, holes, or uneven patches. Use spackling compound to fill small imperfections and sand down rough areas to create a smooth surface.
Moisture and Structural Considerations:
- Ensure wall is completely dry
- Check for water damage
- Repair any structural issues
- Use appropriate moisture barrier
- Verify wall can support tile weight
For drywall areas, consider installing a cement backer board. This provides a stable, moisture resistant surface that prevents tile adhesive from failing and protects against potential water damage.
Pro Tip: Invest in a high quality laser level to ensure your wall surface is perfectly straight before beginning tile installation.
5. Best Installation Practices for Glass Subway Tiles
Installing glass subway tiles requires precision, patience, and the right technique. A flawless backsplash starts with understanding the nuanced approach to tile placement and adhesion.
Strategic tile installation methods are crucial for achieving a professional looking result. Professional installers know that success lies in meticulous preparation and careful execution.
Essential Installation Techniques:
- Use specialized glass tile adhesive
- Work in small manageable sections
- Apply even pressure during placement
- Maintain consistent grout line spacing
- Allow proper curing time
Choosing the correct adhesive is fundamental when working with glass subway tiles. Standard tile adhesives can fail with glass surfaces. Opt for a transparent or white modified thinset mortar specifically designed for glass tiles. This ensures maximum bond strength and prevents unsightly discoloration behind your beautiful new backsplash.
Precision Placement Strategies:
- Use plastic tile spacers for uniform gaps
- Check level and alignment frequently
- Clean tiles immediately after placement
- Remove excess adhesive promptly
- Verify vertical and horizontal alignment
Applying tiles requires a systematic approach. Start from the bottom center and work outward. This method helps maintain a balanced look and minimizes cutting requirements. Use a rubber float to press tiles gently into the adhesive, ensuring complete coverage and preventing air pockets.
Pro Tip: Invest in a high quality laser level and tile spacers to guarantee perfectly aligned glass subway tiles with professional looking results.
6. Cleaning and Maintenance Tips for Lasting Shine
Glass subway tiles transform your kitchen backsplash into a stunning visual feature that demands proper care and maintenance. Keeping these reflective surfaces pristine requires a strategic approach to cleaning and preservation.
Regular maintenance techniques are essential for maintaining the brilliant shine and transparency of your glass subway tiles. Understanding the right cleaning methods will ensure your backsplash looks spectacular for years to come.
Daily Cleaning Essentials:
- Use soft microfiber cloths
- Opt for mild dish soap
- Avoid abrasive cleaning tools
- Wipe surfaces after cooking
- Prevent water spot accumulation
Microfiber cloths are your best ally in keeping glass subway tiles spotless. These soft cloths effectively remove grease, splatter, and fingerprints without scratching the delicate glass surface. Create a simple cleaning solution using warm water and a few drops of mild dish soap for routine maintenance.
Deep Cleaning Strategies:
- Use white vinegar solution occasionally
- Spray and wipe in smooth motions
- Rinse with clean water
- Buff with dry microfiber cloth
- Address stubborn stains immediately
For tougher grime, a mixture of white vinegar and water works wonders. The mild acidic properties help break down cooking residues and mineral deposits without damaging the glass surface. Always test cleaning solutions in a small inconspicuous area first to ensure compatibility.
Pro Tip: Keep a designated microfiber cloth and spray bottle with gentle cleaning solution near your kitchen for quick and easy glass tile maintenance.
7. Budgeting Strategies for a Stylish Kitchen Makeover
Creating a stunning kitchen backsplash does not mean breaking the bank. Smart homeowners understand that strategic planning can deliver high impact design without draining their savings.
Effective renovation budgeting requires careful consideration of materials and installation methods that maximize style while minimizing expenses. Your glass subway tile project can be both beautiful and budget friendly.
Budget Friendly Strategies:
- Choose affordable tile materials
- Consider partial tile installations
- Explore DIY installation options
- Use accent tiles strategically
- Compare multiple supplier quotes
Glass subway tiles offer remarkable versatility in pricing. Ceramic and basic glass subway tiles provide an economical alternative to premium materials. By selecting standard sized tiles and minimizing complex cutting requirements, you can significantly reduce overall project costs.
Smart Cost Reduction Techniques:
- Purchase tiles during seasonal sales
- Buy slightly extra to account for cuts and breakage
- Select neutral colors with wider availability
- Mix high end accent tiles with standard tiles
- Negotiate installation rates
Understand that labor often represents a substantial portion of backsplash expenses. Learning basic installation techniques or enlisting help from handy friends can dramatically reduce your total project investment. Many homeowners successfully complete glass subway tile installations as weekend projects.
Pro Tip: Request tile samples before purchasing and calculate exact square footage to prevent overbuying and unnecessary expenses.
Below is a comprehensive table summarizing the key insights and steps outlined in the article regarding glass subway tiles and their use in kitchen backsplashes.
| Aspect | Details | Benefits |
|---|---|---|
| Unique Features of Glass Subway Tiles | They reflect light, creating a luminous and spacious feel. | Enhances the kitchen’s brightness and creates a modern aesthetic. |
| Design Versatility | Adaptable to various styles, such as modern and contemporary. | Allows personalized and stylish backsplashes. |
| Color Selection | Choose colors that complement the kitchen’s existing palette and lighting conditions. | Harmonizes the kitchen’s design and enhances its visual appeal. |
| Backsplash Measurement | Measure and calculate accurately, considering interruptions and tile dimensions. | Ensures a precise and cost-effective tile application. |
| Wall Preparation Steps | Clean, repair, and condition the wall surface before tiling. | Prevents installation issues and ensures tile longevity. |
| Installation Techniques | Use appropriate adhesives, spacers, and alignment tools. | Achieves a professional-quality appearance. |
| Maintenance Tips | Employ gentle cleaning solutions and methods to maintain shine and integrity of the tiles. | Prolongs the pristine look and functionality of the backsplash. |
| Cost-Saving Measures | Optimize materials, consider DIY where suitable, and use accent tiles effectively. | Achieves a stylish design within the budget. |
Elevate Your Kitchen with Expertly Selected Glass Subway Tiles
Transforming your kitchen backsplash with glass subway tiles brings both style and practicality but it also comes with challenges like choosing the right color, measuring accurately, and mastering installation techniques. If you are seeking to avoid costly mistakes and want to ensure your backsplash reflects your unique style while lasting for years, understanding factors like tile adhesive, wall preparation, and cleaning methods is essential.
At TileChoices.com, we provide everything you need to confidently bring your glass subway tile project to life. From a vast selection of high-quality glass tiles in varied colors and textures to detailed product descriptions and helpful sample requests, we support every step of your backsplash makeover. Discover expert guidance on planning your backsplash and access trusted advice on choosing the right adhesives and installation tools designed specifically for glass tiles. Don’t settle for anything less than a stunning, professional finish.
Explore your design possibilities now and start creating the kitchen backsplash you have always envisioned. Visit TileChoices.com today to shop premium glass subway tiles and turn your stylish kitchen dream into reality.


