

Finding high quality materials for your next renovation can make all the difference in tile longevity and appearance. Many American homeowners are discovering that epoxy grout offers up to three times more durability than traditional grout, making it a smart investment for kitchens and bathrooms. Understanding how epoxy grout enhances both strength and style will help you create a space that stays beautiful and low maintenance for years.
Table of Contents
- 1. Know The Benefits Of Epoxy Grout For Home Tiles
- 2. Choose The Right Color For Seamless Tile Design
- 3. Prep Your Tile Surface For Epoxy Grout Application
- 4. Follow Step-By-Step Application For Smooth Results
- 5. Clean Excess Grout Without Damaging Tiles
- 6. Seal And Protect Epoxy Grout For Long-Lasting Finish
- 7. Maintain Epoxy Grout To Prevent Stains And Cracks
Quick Summary
| Key Insight | Explanation |
|---|---|
| 1. Epoxy grout offers superior durability | Compared to traditional cement grout, epoxy grout resists cracking, chipping, and wear, ensuring tile installations maintain their appearance longer. |
| 2. Stain and chemical resistance is exceptional | Epoxy grout creates a nonporous surface that repels water, oils, and contaminants, making it easier to clean and maintain in moisture-prone areas. |
| 3. Choose grout color wisely for design impact | Color selection affects aesthetics; matching grout creates a seamless look, while contrasting colors enhance visual interest, especially in patterned tiles. |
| 4. Proper surface preparation is critical | Thoroughly clean and inspect your tile surface before applying epoxy grout to ensure adherence and prevent installation failures. |
| 5. Regular maintenance protects your investment | Establish a routine cleaning and sealing schedule to prevent stains and preserve the epoxy grout’s integrity over time. |
1. Know the Benefits of Epoxy Grout for Home Tiles
Epoxy grout is a game changing solution for homeowners looking to upgrade their tile installations with superior protection and longevity. Unlike traditional cement grout, epoxy grout offers remarkable advantages that can transform how you think about tile maintenance and durability.
At its core, epoxy grout is a specialized material that combines cement, water, and sand with advanced admixtures to create an incredibly robust sealing solution. Its unique composition provides homeowners with significant performance benefits that go far beyond standard grouting options. Epoxy resin materials offer superior mechanical properties that make them ideal for areas exposed to moisture, heavy traffic, and potential staining.
One of the most compelling advantages of epoxy grout is its exceptional chemical and stain resistance. Traditional grouts can absorb liquids, develop mold, and deteriorate quickly in high moisture environments like bathrooms and kitchens. Epoxy grout creates a seamless, nonporous surface that actively repels water, oils, and potential contaminants. This means your tile installations remain pristine and easier to clean for years longer than conventional grouting methods.
Durability is another standout feature of epoxy grout. Its dense molecular structure makes it significantly more resistant to cracking, chipping, and wear compared to standard cement based grouts. Homeowners can expect their tile installations to maintain their original appearance and structural integrity even in high traffic areas or spaces with extreme temperature variations.
Customization is an additional benefit many homeowners appreciate. Epoxy grout comes in a wide range of colors and finishes, allowing you to match or contrast with your existing tile design. This flexibility means you can create unique visual effects while simultaneously protecting your investment.
Pro tip: Before installation, always purchase a small sample of epoxy grout and test it in an inconspicuous area to ensure the color and finish match your specific tile project requirements.
2. Choose the Right Color for Seamless Tile Design
Selecting the perfect grout color is more than a minor design detail. It is a strategic decision that can dramatically transform the visual impact of your tile installation and create a cohesive aesthetic throughout your space.
Grout color plays a critical role in tile design, offering homeowners two primary approaches: seamless blending or intentional contrast. Ceramic tile grout offers a wide range of premixed colors that allow you to either create an uninterrupted visual plane or highlight specific tile patterns.
When aiming for a seamless look, choose a grout color that closely matches your tile color. This technique creates a smooth continuous surface where tile edges seem to disappear, making smaller spaces feel larger and more uniform. Matching grout works exceptionally well with monochromatic tile designs or when you want a clean minimalist appearance.
For those seeking visual drama, contrasting grout colors can transform tile installations into artistic statements. Darker grout against lighter tiles or vice versa can create bold geometric patterns that draw the eye and add architectural interest to your space. This approach works particularly well with geometric tile shapes like hexagons or intricate mosaic designs.
Professional designers recommend testing grout samples in your actual space before making a final decision. Lighting conditions and surrounding colors can significantly impact how a grout color appears, so what looks perfect in a showroom might look completely different in your home.
Pro tip: Purchase small grout sample tiles and place them in your intended installation area under different lighting conditions to ensure the color meets your design expectations.
3. Prep Your Tile Surface for Epoxy Grout Application
Successful epoxy grout installation begins long before you mix the first batch. Proper surface preparation is the critical foundation that determines the durability and appearance of your tile project.
Surface cleaning is your first and most important step. Every trace of dust, debris, and oily residue must be eliminated to ensure proper epoxy grout adhesion. Following specific tile surface preparation standards helps prevent potential installation failures and guarantees professional results.
Begin by thoroughly cleaning your tile surface using a professional grade degreasing solution. Remove all construction dust, previous grout residue, and any waxy or oily substances that could interrupt bonding. Use a stiff bristle brush and clean white rags to ensure a completely pristine surface. Pay special attention to tile edges and corners where contaminants often accumulate.
Next, inspect your tile joints carefully. Uneven or extremely wide joints can compromise your epoxy grout application. Measure and evaluate joint width uniformity. If significant variations exist, you might need to use specialized fillers or adjust tile placement before grouting. Consistent joint width ensures a smoother application and more attractive final appearance.
Ventilation and temperature also play crucial roles in epoxy grout preparation. Work in a well ventilated area with consistent temperatures between 50 and 90 degrees Fahrenheit. Extreme temperatures can negatively affect epoxy grout curing and overall performance.
Pro tip: Always purchase a few extra tile samples and practice your epoxy grout application technique before tackling your main project to build confidence and perfect your approach.
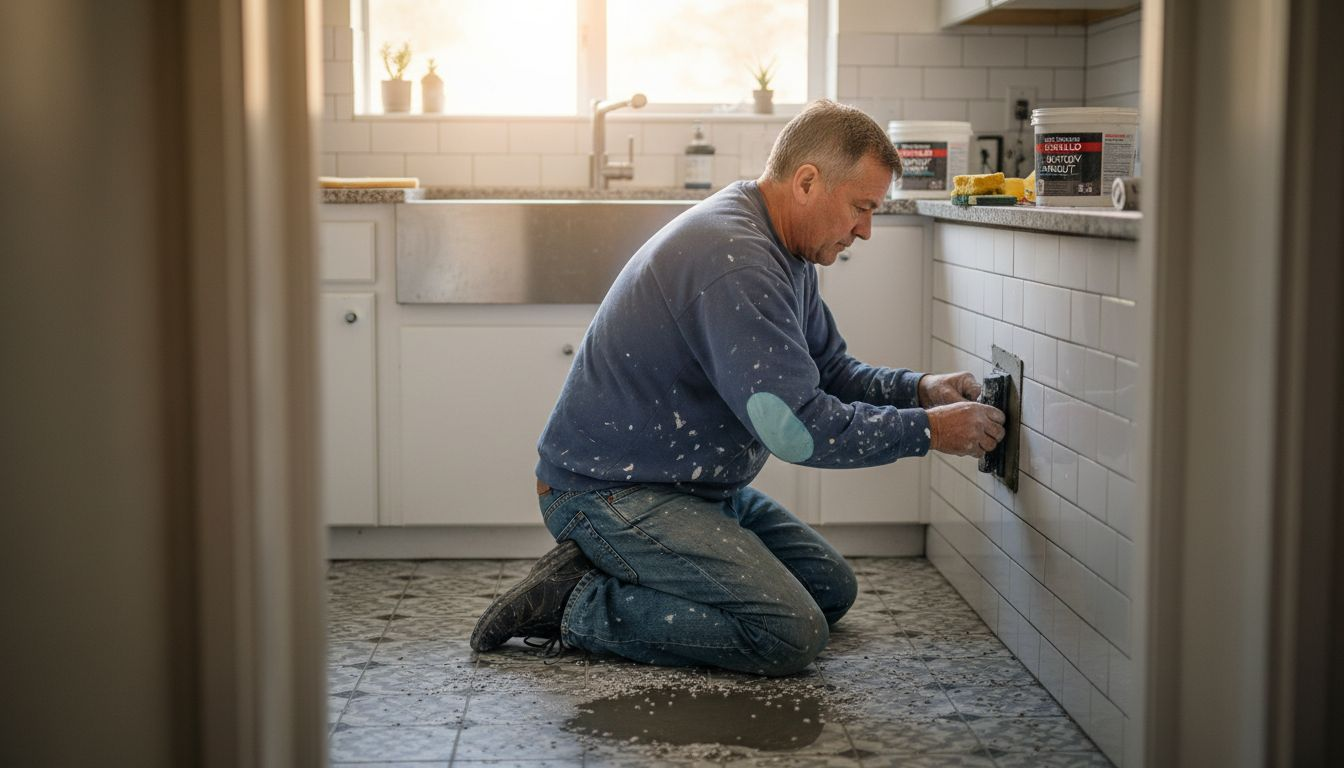
4. Follow Step-by-Step Application for Smooth Results
Epoxy grout application is a precise process that requires careful attention to detail and systematic execution. One wrong move can compromise the entire tile installation, making a methodical approach essential for professional looking results.
Grout specification guidelines emphasize the critical steps for successful epoxy application, starting with accurate component mixing. Begin by carefully measuring both the epoxy resin and hardener components in exact proportions. Most epoxy grout systems require a precise two part mixture where exact ratios determine proper curing and performance.
Mixing technique matters as much as measurement. Use a slow speed drill with a mixing paddle to combine components thoroughly without introducing air bubbles. Mix for approximately 2 to 3 minutes until the mixture appears completely uniform with no streaking. Work quickly but carefully as epoxy grout has a limited working time before it begins to set.
Application requires strategic timing and technique. Use a rubber float held at a 45 degree angle to force the epoxy grout deeply into tile joints. Move diagonally across tile surfaces to ensure complete joint coverage and minimize air pocket formation. Work in small sections to maintain control and prevent premature curing.
Cleaning excess grout is a critical step that many DIY enthusiasts overlook. Remove excess epoxy from tile surfaces within 15 to 20 minutes using clean white rags and a specialized grout haze remover. Waiting too long makes removal significantly more difficult and can permanently damage tile surfaces.
Pro tip: Keep a bucket of clean water and several white towels nearby during application to quickly address any unexpected spills or excess grout before it sets.
5. Clean Excess Grout Without Damaging Tiles
Removing excess epoxy grout requires precision and the right approach to protect your beautiful tile investment. One wrong move can scratch or permanently damage your tile surface, transforming a perfect installation into a costly mistake.
Specialized grout cleaning techniques help homeowners remove residue safely without compromising tile integrity. Start by selecting a cleaning solution specifically designed for your tile type. Ceramic and porcelain tiles have different cleaning requirements compared to natural stone surfaces, so understanding your material is crucial.
Timing is everything when cleaning excess grout. For epoxy grout, begin removing residue within 15 to 20 minutes of application. Use soft white cloths or specialized grout sponges to gently wipe away excess material. Move in circular motions with minimal pressure to avoid scratching the tile surface.
Avoid harsh chemical cleaners that can etch or discolor your tiles. Instead, opt for pH neutral cleaning solutions designed for epoxy grout removal. Test any cleaning product on a small inconspicuous area first to ensure it does not damage your specific tile finish. Some professional grade grout haze removers work exceptionally well without risking tile damage.
Maintain a consistent cleaning technique across all tiles. Work systematically from one section to another, using clean portions of your cloth or sponge to prevent redepositing grout residue. Rinse your cleaning tools frequently to keep them free from accumulated grout particles.
Pro tip: Keep multiple clean white towels and a bucket of fresh water nearby during grout cleaning to quickly address any residue before it fully hardens.
6. Seal and Protect Epoxy Grout for Long-Lasting Finish
Epoxy grout might seem inherently durable, but proper sealing can significantly extend its lifespan and maintain its pristine appearance. Understanding how to protect your grout investment is crucial for preserving your tile installation’s beauty and functionality.
Polymer chain crosslinking plays a critical role in enhancing epoxy grout’s protective capabilities/18%3A_Ethers_and_Epoxides_Thiols_and_Sulfides/18.09%3A_Chemistry_MattersEpoxy_Resins_and_Adhesives), creating a robust barrier against moisture and potential damage. While epoxy grout is naturally more resistant than traditional cement grout, an additional protective sealant can provide an extra layer of defense against stains, chemical exposure, and environmental wear.
Choose a sealant specifically compatible with epoxy grout formulations. Not all sealants work effectively with epoxy, so read product labels carefully. Look for sealants that offer UV protection, moisture resistance, and chemical stability. Apply the sealant approximately 48 to 72 hours after the initial grout installation to ensure complete curing.
Application technique matters as much as product selection. Use a foam applicator or specialized grout sealer brush to ensure even coverage. Work in small sections, applying thin uniform layers and removing excess sealant immediately. Allow each layer to dry completely before applying subsequent coats. Most professional grade sealants recommend two to three thin layers for maximum protection.
Regular maintenance extends the effectiveness of your sealed grout. Perform annual inspections to check for any signs of wear, discoloration, or potential resealing requirements. High traffic areas or spaces exposed to significant moisture might need more frequent attention.
Pro tip: Always test your chosen sealant on a small inconspicuous area first to ensure color compatibility and desired finish before applying it across the entire tiled surface.
7. Maintain Epoxy Grout to Prevent Stains and Cracks
Epoxy grout requires consistent care to maintain its durability and aesthetic appeal. Preventative maintenance is far more effective than reactive repairs when it comes to protecting your tile investment.
Professional maintenance guidelines recommend regular inspections and targeted cleaning techniques to preserve epoxy grout’s structural integrity. Begin by establishing a routine cleaning schedule that addresses potential stain sources before they become permanent.
Immediate spill management is crucial for preventing permanent staining. Keep soft white cloths and a neutral pH cleaning solution nearby in areas prone to spills such as kitchens and bathrooms. Blot spills quickly rather than wiping, which can spread the substance and potentially drive it deeper into grout lines.
Temperature and moisture control play significant roles in preventing grout deterioration. Avoid dramatic temperature fluctuations that can cause expansion and contraction. In bathrooms and kitchens, ensure proper ventilation to reduce humidity levels that might compromise grout integrity. Use exhaust fans and keep surfaces dry after cleaning or water exposure.
Periodic professional grade sealing provides an additional protective barrier against potential stains and moisture penetration. Reapply sealant every 12 to 18 months or according to manufacturer recommendations. Always choose a sealant compatible with your specific epoxy grout type to ensure optimal protection.
Pro tip: Create a dedicated tile and grout maintenance kit with microfiber cloths, neutral cleaner, and soft brushes to quickly address potential stains and maintain your epoxy grout’s pristine condition.
This table provides a comprehensive summary of the key insights and guidelines for utilizing epoxy grout in home tile installations, covering benefits, selection strategies, application processes, and maintenance practices.
| Aspect | Details | Key Considerations |
|---|---|---|
| Benefits of Epoxy Grout | - High resistance to stains, chemicals, and moisture. - Superior durability against cracks and wear. - Wide range of color customization to match design needs. |
Enhanced lifespan and reduced maintenance requirements. |
| Color Selection | - Seamless blending: Match grout to tile color for a unified look. - Intentional contrast: Use contrasting grout for artistic effects. |
Test grout color in actual lighting conditions to ensure it meets expectations. |
| Surface Preparation | - Thoroughly clean the tile surface. - Check and adjust joint widths. - Ensure proper ventilation and room temperature. |
Proper preparation ensures strong adhesion and prevents premature grout failure. |
| Application Process | - Mix components precisely and thoroughly. - Apply using a rubber float at a 45° angle. - Clean excess grout promptly. |
Methodical application prevents errors and ensures a professional finish. |
| Excess Grout Removal | - Begin cleaning within 15–20 minutes of application. - Use soft cloths or sponges with pH-neutral solutions. - Avoid harsh chemicals. |
Prevents grout residue damage and maintains the tile’s visual appeal. |
| Sealing | - Select a sealant compatible with epoxy grout. - Apply thin, even layers 48–72 hours post-installation. - Conduct periodic inspections. |
Preserves durability and appearance against external factors over time. |
| Maintenance | - Conduct regular inspections and cleanups. - Control temperature and humidity. - Keep a dedicated maintenance kit for spill management. |
Preventative maintenance ensures long-lasting protection and aesthetic quality. |
Elevate Your Tile Projects with Expert Epoxy Grout Solutions
Mastering epoxy grout is essential to protect your tile surfaces from stains cracks and wear while achieving a flawless finish that lasts. This article highlights key challenges such as proper surface preparation precise mixing and timely cleaning that every homeowner must understand to preserve beauty and durability in their tile installations. At TileChoices.com we recognize that selecting the right tiles is just the first step toward a stunning and resilient project.
Explore our extensive collection of high-quality tiles designed to complement epoxy grout applications whether you desire seamless blends or striking contrasts. Our user-friendly platform offers detailed product descriptions and image galleries to help you envision your ideal space. With options for sample requests secure payments and dedicated customer support you can confidently plan your renovation or home improvement project today. Ready to transform your space with materials that work perfectly together Discover how TileChoices.com can be your trusted partner in creating stylish functional tile designs backed by expert advice. Start browsing our collections now and take the first step toward a beautiful long-lasting tile installation.


