
Grout haze can wreck the look of brand new tiles, leaving a milky film even after all your hard renovation work. Most people grab the strongest cleaner they find, thinking brute force does the trick. But here’s the twist—the right technique and simple household products like white vinegar can outperform harsh chemicals and protect your tiles at the same time. Turns out, the secret to spotless tiles starts with careful prep and a smart plan.
Table of Contents
- Step 1: Gather Your Cleaning Materials And Tools
- Step 2: Test The Cleaning Solution On A Small Area
- Step 3: Apply The Cleaning Solution To The Grout Haze
- Step 4: Scrub The Grout Haze Using A Sponge Or Brush
- Step 5: Rinse The Area Thoroughly And Dry
Quick Summary
| Key Point | Explanation |
|---|---|
| 1. Gather all cleaning materials first | Ensure you have necessary tools like microfiber cloths, gloves, and a bucket to streamline the cleaning process from the start. |
| 2. Test cleaning solution on a small area | Always apply your chosen cleaner to an inconspicuous spot first to avoid damaging your tile or grout. |
| 3. Apply cleaning solution evenly | Use a soft sponge or cloth, applying in small sections with circular motions to effectively break down grout haze. |
| 4. Scrub gently to avoid damage | Use light pressure and circular motions while scrubbing the haze, ensuring you do not scratch the tile surface. |
| 5. Rinse thoroughly and dry immediately | Remove all cleaning solution with fresh water and dry the area to prevent spots or mineral deposits from forming. |
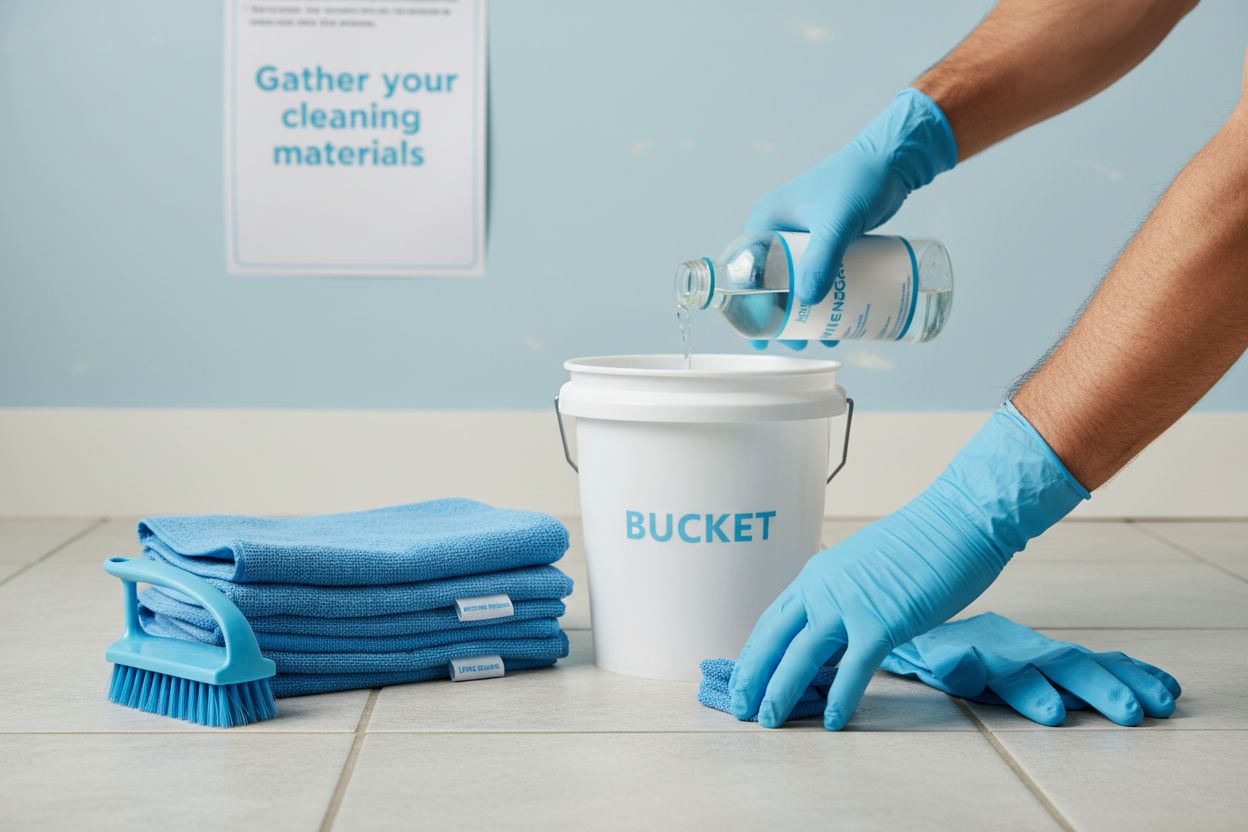
Step 1: Gather your cleaning materials and tools
Removing grout haze requires careful preparation and the right cleaning arsenal. Before diving into the cleaning process, gathering all necessary materials ensures a smooth and efficient workflow. Your success in eliminating grout haze depends significantly on selecting appropriate tools and cleaning solutions that match your specific tile surface.
To start, you will need a comprehensive set of cleaning materials designed specifically for grout haze removal. Essential tools include:
- Soft, clean microfiber cloths
- Rubber or latex gloves to protect your hands
- Bucket for mixing cleaning solutions
- Soft-bristled scrub brush
- White vinegar or specialized grout haze remover
- Clean water
- Sponges with a non-abrasive side
Choosing the right cleaning solution is crucial for protecting your tile surfaces. While commercial grout haze removers are available, many homeowners find success with simple household ingredients like white vinegar. If you’re working with delicate natural stone tiles, check out our guide on tile care to ensure you select a solution that won’t damage your specific tile type.
Preparing your workspace is equally important. Clear the area of any furniture or objects that might obstruct your cleaning process. Lay down old towels or protective sheeting to catch any drips or spills.
Here is a table organizing the essential tools and materials used for grout haze removal, along with their purpose in the process.
| Tool/Material | Purpose |
|---|---|
| Microfiber cloths | Gentle cleaning and drying, prevents scratches |
| Rubber/latex gloves | Protects hands from cleaners and irritants |
| Bucket | Mixing cleaning solutions, holding water |
| Soft-bristled brush | Scrubbing grout haze without scratching |
| White vinegar/grout remover | Breaks down cement haze residue |
| Clean water | Rinsing away cleaning solution and haze |
| Non-abrasive sponges | Applies cleaner and gently scrubs surface |
| Ensure good ventilation by opening windows or using fans, particularly if you’re using chemical cleaning solutions. |
Wear protective clothing and gloves to shield your skin from potential irritants. Long sleeves, pants, and closed-toe shoes provide additional protection. If you have sensitive skin or are using strong chemical cleaners, consider wearing safety glasses to prevent accidental splashes.
Before beginning the actual cleaning, take a moment to test your chosen cleaning solution on a small, inconspicuous area. This preliminary test helps you understand how the solution interacts with your specific tile and grout, preventing potential damage or discoloration to the entire surface. Wait a few minutes and observe any reactions, ensuring the solution doesn’t cause unwanted effects before proceeding with full-scale cleaning.
Below is a summary table of all steps to remove grout haze, including the purpose of each step and key considerations to keep in mind.
| Step | Purpose | Key Considerations |
|---|---|---|
| Gather Materials & Tools | Prepare for efficient, effective cleaning | Choose appropriate tools and solutions for your tile type; wear protective gear |
| Test Cleaning Solution | Ensure compatibility and avoid surface damage | Test on an inconspicuous area and observe for adverse reactions |
| Apply Cleaning Solution | Break down and loosen grout haze | Work in small sections; apply with soft sponge; don’t saturate tiles |
| Scrub Grout Haze | Remove dissolved haze without scratching tile | Use gentle, circular motions; use non-abrasive tools; rinse tool frequently |
| Rinse & Dry Area | Eliminate all residue and prevent new spots | Use clean water, change it often, and dry tiles thoroughly |
Step 2: Test the cleaning solution on a small area
Testing your cleaning solution is a critical step in the grout haze removal process that prevents potential damage to your entire tile surface. This precautionary measure allows you to understand how the cleaning solution interacts with your specific tile material and grout composition before applying it broadly. Ceramic, porcelain, natural stone, and glass tiles each react differently to cleaning agents, making this preliminary test essential for protecting your investment.
Select a small, inconspicuous area for your test patch. Ideal locations include a corner behind an appliance, inside a closet, or an area typically hidden from direct view. This strategic selection ensures that any potential discoloration or adverse reaction remains unnoticed while you determine the solution’s compatibility.
Prepare your test area by cleaning it thoroughly with a damp cloth to remove any surface dust or debris. Apply a small amount of your chosen cleaning solution using a soft cloth or sponge, working it gently into the grout and tile surface. Use minimal pressure and a circular motion to distribute the solution evenly.
Leave the cleaning solution on the test area for approximately 5 to 10 minutes. During this time, observe the surface carefully for any signs of unwanted reactions. Watch for potential warning signs such as:
- Discoloration of the tile or grout
- Surface etching or dulling
- Unexpected chemical reactions
- Changes in texture or sheen
Professional tile installation experts recommend paying close attention to how different materials respond to cleaning solutions. Natural stone tiles, for instance, are more sensitive and might require specialized cleaners compared to ceramic or porcelain surfaces.
After the designated waiting period, rinse the test area thoroughly with clean water. Use a soft, damp cloth to remove all traces of the cleaning solution. Dry the area completely with a clean microfiber towel and inspect the surface under good lighting. Look for any subtle changes in color, texture, or appearance that might indicate potential issues.
If the test area shows no adverse reactions and looks clean and undamaged, you can proceed with confidence to clean the entire surface.
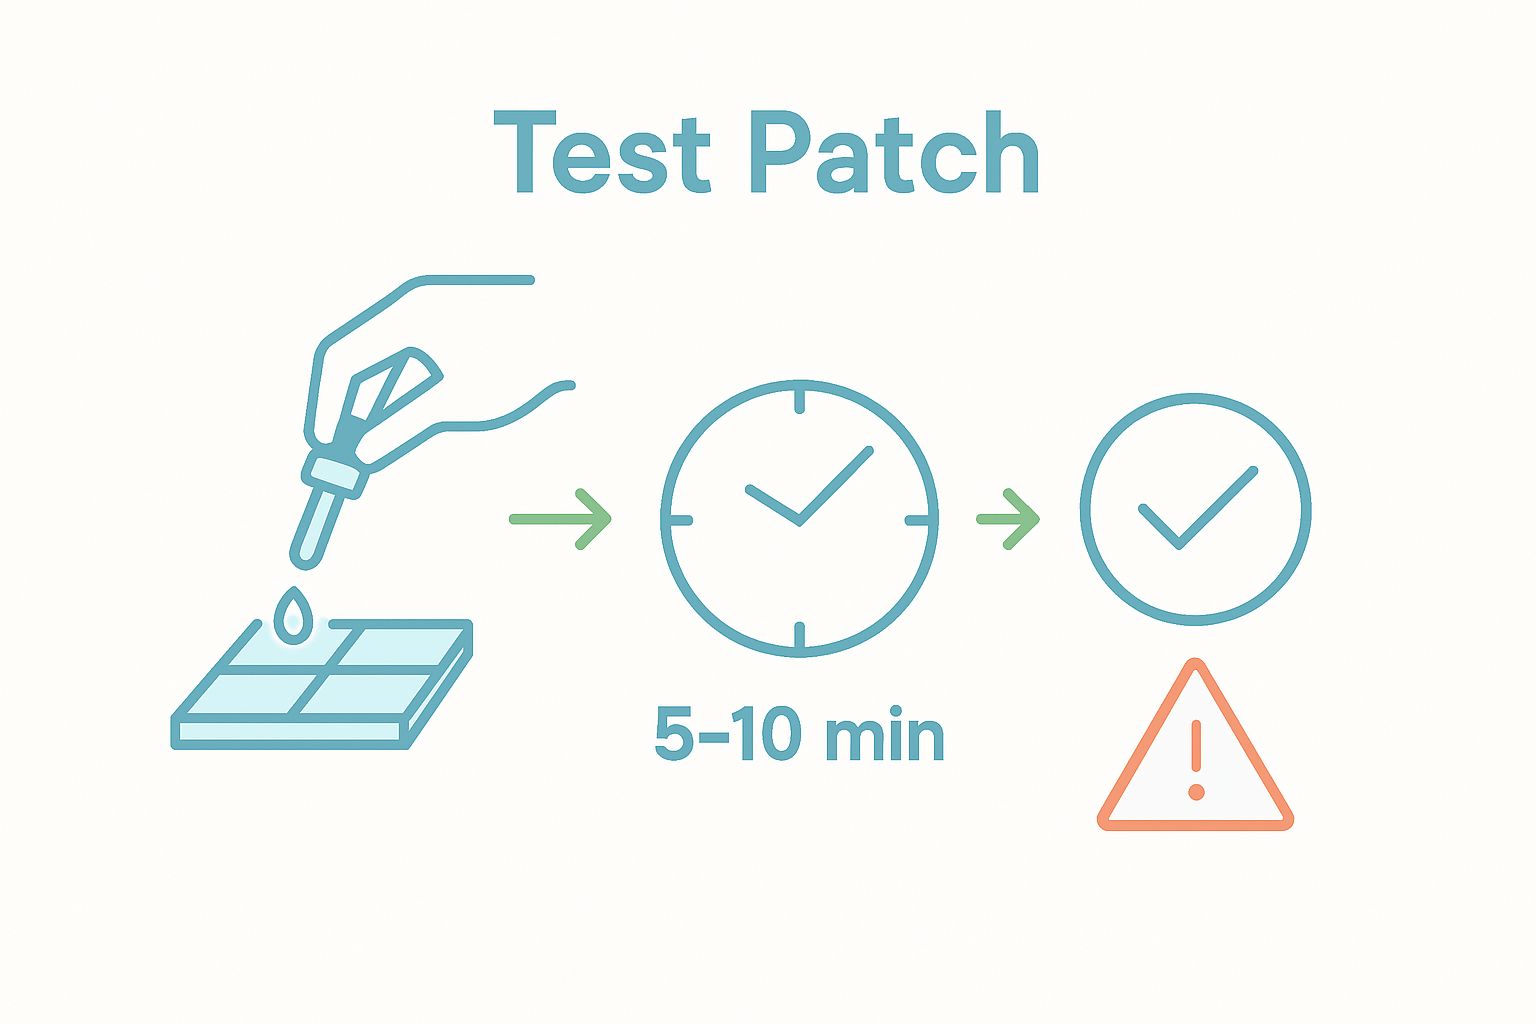 However, if you notice any concerning changes, discontinue use of that particular cleaning solution and seek an alternative method or consult a professional tile cleaning service. This careful approach ensures you protect your tiles while effectively removing grout haze.
Step 3: Apply the cleaning solution to the grout haze
Applying the cleaning solution is a precise process that requires patience and attention to detail. After successfully testing your chosen solution, you are now ready to tackle the grout haze across your entire tile surface. The goal is to break down and dissolve the thin layer of cement residue without damaging the tile or grout underneath.
Begin by preparing your workspace. Ensure the area is well-ventilated and you are wearing protective gloves and clothing. If you’re using a commercial grout haze remover, carefully read and follow the manufacturer’s instructions. For those using white vinegar, create a solution of equal parts water and vinegar in your prepared bucket.
Start at one corner of the tiled area and work systematically across the surface. Apply the cleaning solution sparingly but evenly, using a soft, non-abrasive sponge or cloth. Move in small sections to maintain control and ensure thorough coverage. The key is to apply enough solution to break down the haze without saturating the surface.
Use gentle, circular motions to work the solution into the grout lines and tile surface. Avoid applying excessive pressure, which could potentially scratch delicate tiles. Allow the solution to sit for 5 to 10 minutes, depending on the thickness of the grout haze. During this time, the acidic properties of the cleaner will begin to dissolve the cement residue.
Learn more about proper grout maintenance to keep your tiles looking pristine long after this initial cleaning. Some important considerations during application include:
- Work in small, manageable sections
- Maintain a consistent application technique
- Keep the surface slightly damp but not soaking wet
- Pay extra attention to areas with heavier haze buildup
As you progress, periodically rinse your sponge or cloth to prevent spreading dissolved haze back onto clean areas. If you notice the solution drying too quickly, lightly mist the area with clean water to keep it workable. This prevents premature drying and ensures the cleaning solution can effectively break down the grout haze.
After completing the application across the entire surface, let the solution sit for the recommended time. The waiting period allows the cleaner to break down the cement residue effectively. Watch for any signs of the haze beginning to dissolve or become less opaque, indicating the solution is working its magic. Be patient and resist the urge to scrub aggressively, as this could damage your tile surface.
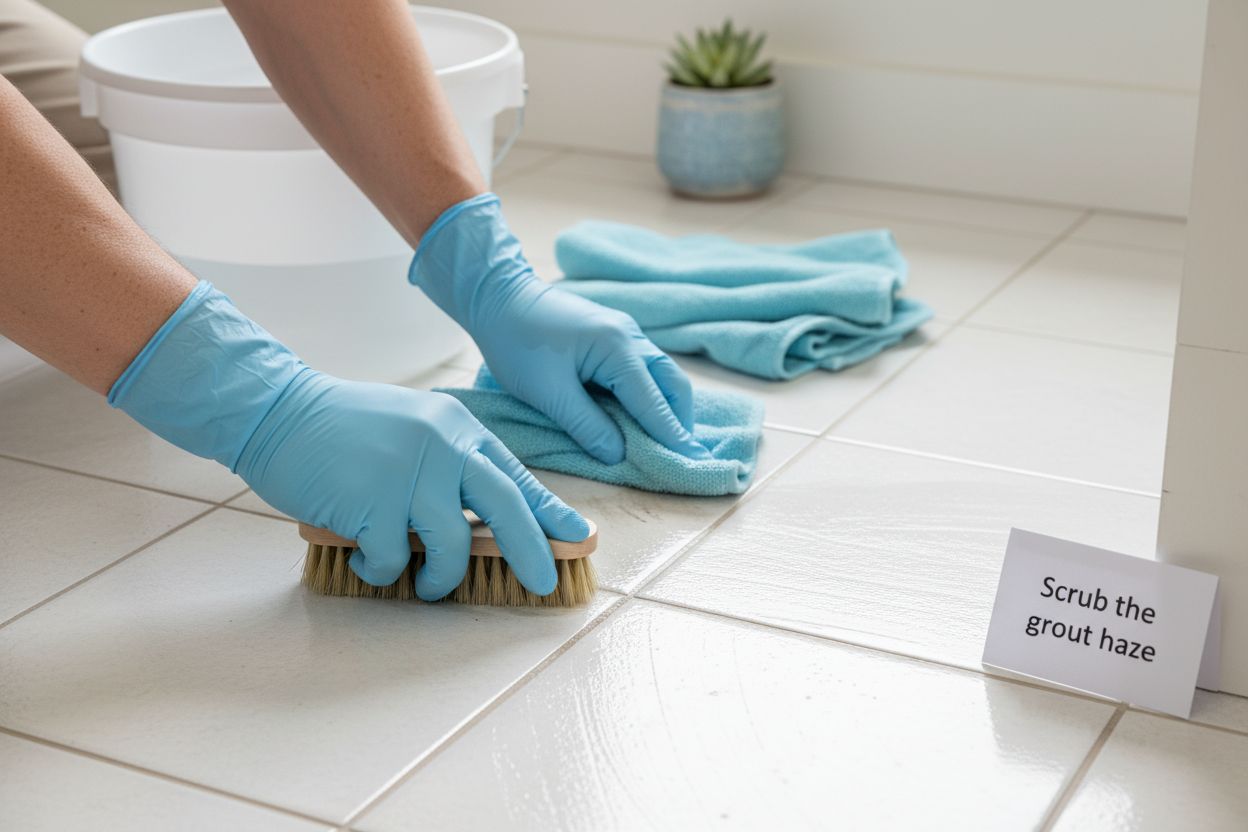
Step 4: Scrub the grout haze using a sponge or brush
Scrubbing the grout haze is a delicate process that requires precision and gentle technique to effectively remove cement residue without damaging your tile surface. The right approach can make the difference between a professional-looking finish and potential tile damage. This step transforms the preliminary cleaning solution application into actual haze removal.
Select your scrubbing tool carefully. For most tile surfaces, a soft, non-abrasive white nylon scrub pad or a soft-bristled brush works best. Avoid steel wool or harsh scrubbing materials that could scratch or damage your tiles. Microfiber cloths and specialized grout sponges are ideal for most residential tile installations.
Begin scrubbing using light, circular motions across the tile surface. Work in small sections, maintaining consistent pressure and technique. The goal is to gently agitate the loosened grout haze without creating additional scratches or marks. Move your hand in controlled, deliberate circles, allowing the cleaning solution to do most of the hard work.
Explore our guide on maintaining tile surfaces to understand long-term care beyond this initial cleaning process. As you scrub, pay special attention to these critical aspects:
- Maintain even, light pressure
- Use circular scrubbing motions
- Rinse your scrubbing tool frequently
- Work systematically across the surface
Periodically rinse your sponge or cloth in clean water to prevent spreading dissolved grout haze back onto clean areas. This step prevents redepositing removed residue and ensures a thorough cleaning process. Change your rinse water frequently to maintain cleanliness and effectiveness.
As you progress, you should notice the grout haze becoming less visible and the tile surface gradually returning to its original shine. Some tiles might require multiple gentle passes to completely remove stubborn haze. Resist the temptation to increase pressure or use more aggressive scrubbing techniques, as this could potentially damage the tile surface.
Once you complete scrubbing a section, wipe the area with a clean, damp microfiber cloth to remove any remaining cleaning solution and loosened haze. This final wipe helps reveal the true cleanliness of your tiles and allows you to identify any areas that might need additional attention. Take your time and work methodically to ensure a comprehensive and careful grout haze removal process.
Step 5: Rinse the area thoroughly and dry
Rinsing and drying represent the final critical stages of grout haze removal, transforming your cleaned surface from potentially cloudy to brilliantly clear. This step removes all remaining cleaning solution and residue, revealing the true beauty of your tile installation. Proper rinsing prevents potential chemical buildup that could dull your tiles or compromise their long-term appearance.
Begin by preparing clean, cool water in a separate bucket. Use fresh water to ensure you are not reintroducing any dissolved grout haze or cleaning solution remnants. Start at the highest point of your tiled surface and work downward, which helps prevent re-contaminating already cleaned areas.
Use a clean, soft sponge or microfiber cloth to rinse the surface systematically. Move in broad, sweeping motions, frequently rinsing your cleaning tool to prevent spreading dissolved residue. Change your rinse water multiple times during this process to maintain maximum cleaning effectiveness. Pay extra attention to grout lines and tile corners where cleaning solution might accumulate.
Learn more about maintaining your tile surfaces to protect your investment long after this initial cleaning. As you rinse, keep these critical points in mind:
- Use clean, fresh water for each rinse
- Work systematically from top to bottom
- Frequently change your rinse water
- Use light, sweeping motions
- Avoid leaving standing water on the surface
After thoroughly rinsing, transition immediately to the drying phase. Use clean, lint-free microfiber towels to absorb moisture quickly and completely. Avoid leaving any water standing on the tile surface, as this could potentially reintroduce mineral deposits or create water spots. Gently pat and sweep the surface, rotating to clean, dry sections of your towel to maximize absorption.
For larger areas, consider using multiple towels or a wet-dry vacuum with a soft attachment to remove moisture efficiently. If working in a well-ventilated space, you can also allow natural air drying, but be present to address any remaining damp spots manually. The goal is a completely dry, streak-free surface that showcases the true color and texture of your tiles.
Once dry, perform a final visual inspection under good lighting. Look for any remaining haze, streaks, or areas that might require additional attention. Your tiles should now appear clean, vibrant, and free of the cloudy cement residue that originally obscured their natural beauty.
Say Goodbye to Grout Haze for Good—Upgrade Your Tile Project Today
Struggling with stubborn grout haze can leave your tiles looking dull and unsatisfying, even after spending hours installing and cleaning. If you’ve followed every careful step in the guide yet still worry about residue or damage to your surfaces, consider the real difference that top-quality tile materials and the right maintenance knowledge can make. At TileChoices.com, you’ll find not only expert advice on proper grout maintenance but also an unmatched selection of durable, easy-to-clean tiles in every style, from classic porcelain to elegant natural stone. Take comfort knowing your next project can be both beautiful and truly low-maintenance.

Do not let grout haze compromise your vision. Explore our full collection at TileChoices.com and discover smart solutions that prevent haze from the very start. Ready for a home you’ll love every time you enter the room? Start planning your upgrade now and experience tiles that shine just as much as your design ideas.
Frequently Asked Questions
What tools do I need to remove grout haze?
To remove grout haze, you’ll need soft microfiber cloths, gloves, a bucket, a soft-bristled scrub brush, white vinegar or a specialized grout haze remover, clean water, and non-abrasive sponges. Gather these materials before starting to ensure an efficient cleaning process.
How should I test my cleaning solution before applying it?
Test your cleaning solution on a small, inconspicuous area of the tile surface before full application. Apply it gently, wait 5 to 10 minutes, then rinse and check for any discoloration or damage.
What is the best method for applying the cleaning solution?
Apply the cleaning solution evenly using a soft sponge or cloth, working in small sections for control. Use light, circular motions to ensure thorough coverage and prevent damage to the tile surface.
How do I effectively scrub the grout haze?
Scrub the grout haze using a soft-bristled brush or a non-abrasive scrub pad, moving in light, circular motions. Work patiently and systematically to avoid damaging the tiles, and rinse your scrub tool frequently to maintain effectiveness.
What should I do after scrubbing the tiles?
After scrubbing, rinse the entire tile surface thoroughly with clean water to remove any remaining solution or haze residue. Use fresh rinse water and change it often to ensure your final rinse is effective and leaves no standing water.
How can I ensure my tiles are completely dry after cleaning?
To dry your tiles, gently wipe down the surfaces with clean, lint-free microfiber towels, ensuring no moisture remains. Inspect the area under good lighting to confirm that streaks or haze are completely gone, achieving a clear, polished finish.


