
Replacing or adding cup pulls to your kitchen or bathroom drawers is one of the most cost-effective and immediately visible improvements you can make in a home. The average kitchen remodel takes weeks. Installing a full set of cup pulls takes an afternoon, and when you stand back at the end of it, the room genuinely looks different. Better. More finished.
This guide walks through the entire process from start to finish: the tools you will need, how to measure correctly, how to drill cleanly, placement guidance for different drawer sizes, and the mistakes that catch first-timers off guard. If you have not yet chosen your cup pulls or are still comparing hardware styles, start with our overview of cup pulls vs. bar pulls vs. knobs. Once you have your finish selected and your pulls in hand, come back here and let's put them in.
What You Will Need Before You Start
Having everything on hand before you begin saves the frustration of stopping mid-project. Here is what the job requires:
Tools
- A power drill with a drill bit sized to your screw diameter (typically 3/16 inch for most residential cup pulls, check your pull's included screws to confirm)
- A hardware installation template, either a purchased metal or plastic template, or a handmade cardboard template (more on this below)
- A screwdriver, either hand or powered, for tightening screws into the pull posts
- A pencil for marking hole locations
- A tape measure
- A level (optional but helpful for very wide drawers or tall drawer faces where alignment is more visible)
- Painter's tape (useful for marking positions and protecting drawer faces from drill plate scratching)
Hardware and Supplies
- Your cup pulls, confirm you have the correct quantity for every drawer you are outfitting
- Screws, most cup pulls come with screws included, but verify that the screw length is appropriate for the thickness of your drawer faces (more on this below)
- Longer screws if needed, available at any hardware store; bring your pull and the included screws with you to match thread diameter
Understanding Cup Pull Measurements Before You Drill
Before anything touches a drill, you need to understand two measurements that govern the entire installation: center-to-center distance and drawer face thickness.
Center-to-Center Distance
The center-to-center (C-to-C) measurement is the distance between the centers of the two mounting holes on your cup pull. This is listed on every cup pull product description, common sizes are 3 inches (76mm), 96mm (approximately 3-3/4 inches), and 3-1/2 inches. When you order cup pulls, this is the measurement you need to match to whatever hole spacing already exists in your drawers if you are replacing old hardware.
If you are replacing existing hardware, measure the current hole spacing before ordering. Place a ruler across the two existing holes and measure from center to center of each hole. If your new cup pulls match that spacing, you will not need to drill new holes, just remove the old hardware and screw in the new. This is the fastest and cleanest scenario.
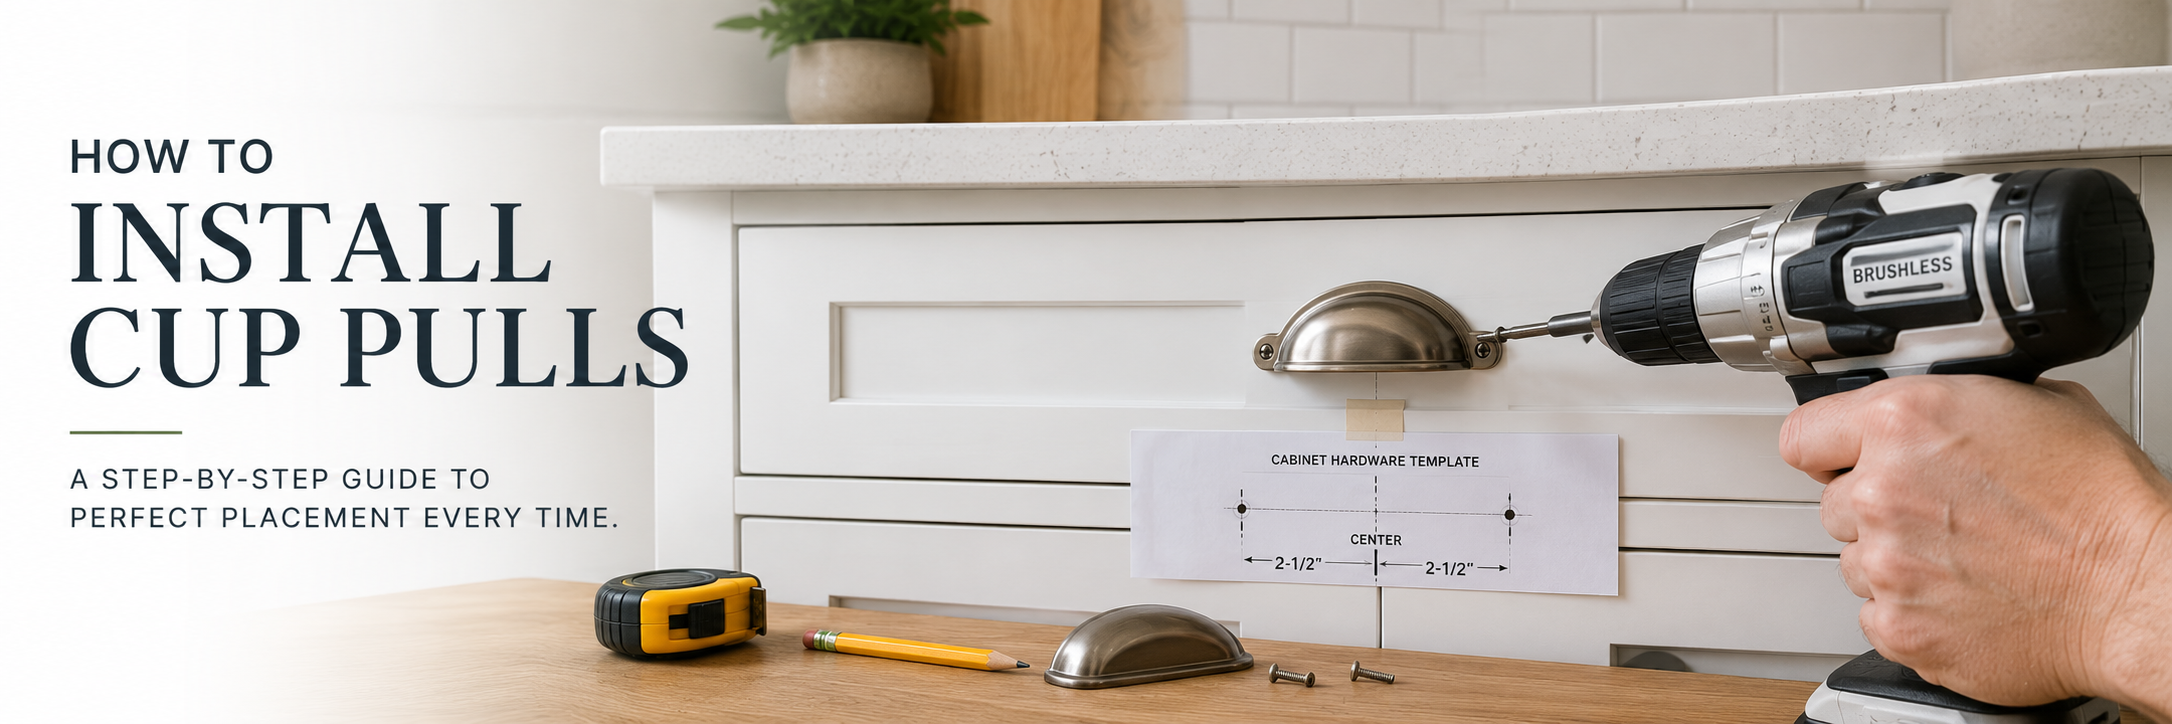
If you are drilling fresh holes, either because there is no existing hardware or because your new pulls have a different C-to-C, a hardware template is essential. You can buy dedicated cabinet hardware installation templates that have pre-measured hole positions for 3 inch, 96mm, and other common spacings. These templates are inexpensive and make the job dramatically faster and more accurate.
Drawer Face Thickness and Screw Length
Most residential drawer faces are between 3/4 inch and 1 inch thick. The screws included with cup pulls are typically designed for a standard 3/4-inch drawer face. If your drawer faces are thicker, particularly on solid wood or custom drawer fronts, the included screws may not be long enough to thread fully into the pull's posts. Measure the thickness of your drawer face, then add the depth of the cup pull's post threading. The total is the minimum screw length you need. Bring your pull and the included screws to a hardware store and ask for the same thread diameter in a longer length if needed.
Conversely, do not use screws that are too long. A screw that extends too far into the drawer post will strip the threading and leave you with a pull that wobbles or will not tighten properly.
How to Make a DIY Installation Template
If you do not have or want to buy a commercial hardware template, you can make a highly accurate one from a piece of cardboard or thin wood in about five minutes. Here is how:
Place your cup pull face-down on the cardboard. Using a pencil, mark the center of each screw post hole. Remove the pull and draw a straight line connecting your two marks. Now mark the vertical center line, the midpoint between the two holes, perpendicular to the horizontal line. This gives you both the C-to-C axis and the centerline of the pull, which you will align to the center of each drawer.
To use the template, hold or tape it to the drawer face in your desired position. Make sure the vertical centerline of the template is aligned with the vertical center of the drawer face, and that your horizontal positioning places the pull where you want it. Mark the two hole centers through the template. Remove the template and drill.
Make one template, verify its accuracy by placing the pull against the marks before drilling, and then use that same template for every drawer in the kitchen. Consistency is what makes a finished hardware installation look professional.
Where to Position Cup Pulls on Drawer Faces
There is no single universally mandated position for cup pulls, but there are widely used conventions that produce clean, comfortable results.
Standard Drawer Height Positioning
For most drawers, cup pulls are centered horizontally on the drawer face and positioned in the upper portion of the drawer, roughly centered within the top third, or placed so the top of the pull is approximately 1 to 2 inches from the top edge of the drawer face. This positioning puts the pull at a natural reach point and creates a clean, consistent look when the drawer is closed.
Some designers and homeowners prefer to center the cup pull perfectly in the vertical middle of the drawer face. This works well on shorter drawer faces (4 inches tall or less) where the top-third positioning might feel too close to the edge. For taller drawer faces, 6 inches or more, top-third placement tends to look more purposeful and is more ergonomically comfortable.
Wide Drawers: When to Use Two Cup Pulls
A single cup pull is appropriate for drawers up to about 24 to 28 inches wide, centered horizontally. For drawers 30 inches wide or wider, common in pot-and-pan drawers, wide base cabinet drawers, and drawer-stack bases, two cup pulls spaced evenly are both more comfortable to use and better proportioned to the drawer face.
To space two cup pulls evenly on a wide drawer, divide the drawer width into thirds. Position one pull at the 1/3 mark from the left edge (measuring to the center of the pull) and one at the 1/3 mark from the right edge. This creates equal spacing between each pull and the edges, and equal spacing between the two pulls, which looks intentional and balanced.
Tall Drawer Faces
Tall drawer faces, found on deep pot drawers, file drawer cabinets, and some custom cabinetry, can take a cup pull either centered vertically or positioned on the top rail area of the drawer face. The top rail position (within the upper third) is generally more practical and comfortable to reach, especially on lower base cabinet drawers where you are already reaching downward.
The Step-by-Step Installation Process
Step 1: Remove Existing Hardware (If Replacing)
Open the drawer to access the interior. Most cup pulls and cabinet hardware attach via machine screws that thread from the front of the drawer face into threaded posts on the back of the pull, you will find the screw heads on the inside face of the drawer front. Using a screwdriver, remove each screw. Hold the cup pull on the outside of the drawer so it does not drop and damage the drawer face as the last screw releases. Set aside the old hardware and any screws you want to keep as length references.
Step 2: Check Your Hole Spacing
If the existing holes match your new cup pull's C-to-C measurement, skip to Step 5. If the spacing does not match, proceed to Step 3.
Step 3: Mark New Hole Positions
Use your hardware template, commercial or homemade, to mark the two new hole positions on the drawer face. Align the template's centerline with the horizontal and vertical center of the drawer face. Apply painter's tape over the drill area first: it prevents the drill bit from walking on the surface and protects the drawer face finish around the hole. Mark both hole positions through the template with a sharp pencil. Remove the template and double-check your marks with a tape measure before drilling anything.
Step 4: Drill the Holes
Using your drill with the correctly sized bit, drill through the drawer face at each marked point. Keep the drill perpendicular to the drawer face, a slightly angled hole makes screw threading harder and can cause the pull to sit crooked. Drill slowly and steadily at the start to keep the bit from walking off the mark, especially on painted surfaces. If you are drilling through a painted or finished surface, a piece of tape over the drill point helps prevent chipping or tear-out at the exit.
If the drawer face is solid wood and you are concerned about tear-out on the interior face, place a scrap piece of wood against the interior face of the drawer front and drill through into it, the scrap acts as a backer and prevents blowout.
Step 5: Thread the Screws
Hold the cup pull against the front of the drawer face, aligning its posts with your drilled holes. From the inside of the drawer, insert the machine screws through the holes and thread them into the pull's posts. Start both screws by hand to make sure they are threading correctly before applying any tool pressure, cross-threading is much easier to cause than to fix. Once both screws are started and threading smoothly, use your screwdriver to tighten.
Step 6: Tighten — But Not Too Much
This is where more cup pulls are damaged than at any other step. Snug the screws firmly, the pull should not wiggle or have any play, but stop before you feel significant resistance. Overtightening machine screws into the threaded posts of a cup pull strips the post threading, which leaves you with a pull that spins freely and will not tighten. If you feel significant resistance after the pull is seated flat and secure, stop. The pull is properly installed.
Step 7: Repeat and Verify Alignment
Move to the next drawer and repeat the process, using the same template every time. After installing three or four pulls, close the drawers and step back to verify alignment. A quick visual check before you are halfway through the kitchen is much easier to correct than one after everything is done.
Common Mistakes to Avoid
Skipping the Template
Measuring each drawer individually and drilling freehand almost always produces slight inconsistencies that add up across a full kitchen. A consistent template used on every drawer is the single biggest determinant of a professional-looking result.
Using the Wrong Screw Length
Screws too short will not grip the pull posts adequately and the hardware will feel loose. Screws too long will bottom out in the post before the pull is seated flush against the drawer face. Always verify screw length against your actual drawer face thickness before you start.
Not Checking for Existing Holes First
Ordering cup pulls with a different C-to-C measurement than your existing holes means drilling new holes, which may leave old holes visible, a problem on painted or finished drawer faces. Measure your existing hardware spacing before ordering if at all possible.
Overtightening
Stripped post threading is the most common installation failure and is almost always caused by overtightening. Snug and firm is the target. Tight-until-you-feel-resistance-and-then-a-half-turn-more is too far.
Drilling Without Tape
Painter's tape over the drill point prevents bit walking on slick painted surfaces and minimizes chipping or finish damage around the hole. It takes ten seconds to apply and saves finishing headaches.
Finishing the Room: Hardware and Tile Together
Once your cup pulls are installed, they will likely make you look at the rest of the kitchen or bathroom with fresh eyes. New hardware has a way of doing that, suddenly the backsplash feels more significant, the grout color more visible, the overall design direction more defined. If your backsplash tile is next on the list, our kitchen backsplash tile collection and our guide on matching cup pull finishes to your backsplash will help you keep the whole room cohesive.
For more design inspiration before or after your hardware installation, our posts on white subway tile ideas, affordable kitchen backsplash ideas, and mixing tile patterns are worth reading before any tile goes on the wall. And if you are still shopping for the right cup pull, our full cup pulls collection and the broader cabinet hardware collection are the place to start.


