

Most American homeowners are surprised to learn that improper tile layouts account for nearly half of costly kitchen and bathroom remodel issues. Choosing the right wall tile pattern goes well beyond mere visual preference. It shapes both the appearance and practicality of your most-used spaces. If you want a renovation that looks polished and stands the test of time, understanding expert tile layout techniques will help you avoid frustrations and maximize your investment.
Table of Contents
- Wall Tile Layout Basics And Common Misconceptions
- Popular Wall Tile Patterns And Variations
- Planning A Tile Layout For Your Space
- How Layout Affects Design And Function
- Avoiding Layout Mistakes And Costly Errors
Key Takeaways
| Point | Details |
|---|---|
| Strategic Planning is Essential | Successful tile installation involves meticulous measurement, substrate preparation, and a detailed layout plan to ensure visual and structural integrity. |
| Tile Layout Choices Impact Functionality | Different patterns and arrangements can significantly affect how a space feels, such as making rooms appear larger or creating a sense of harmony. |
| Avoid Common Mistakes | Poor preparation and incorrect adhesive application can lead to costly errors; high-quality tools and careful planning can prevent these issues. |
| Proactive Material Management | Purchasing extra tiles and ensuring proper glazing can save time and resources during future repairs or maintenance. |
Wall Tile Layout Basics and Common Misconceptions
Navigating wall tile layouts requires understanding critical design principles and avoiding common mistakes that can compromise your project’s aesthetic and functional quality. Professional tile installation demands strategic planning, precision, and knowledge of fundamental layout techniques that go beyond simple visual appeal.
One critical misconception is assuming all tile layouts are equally straightforward. In reality, professional tile layout guidelines emphasize the importance of centering tiles and minimizing small cuts. The American National Standards Institute (ANSI) recommends strategically placing cut tiles at edges while avoiding tiles smaller than half their standard size. This approach ensures a visually balanced and professional-looking installation that maximizes both design integrity and material efficiency.
Substrate preparation and material selection play crucial roles in successful tile layouts. Ceramic tile installation standards highlight that proper backing materials, adhesive application, and surface preparation are fundamental to durability. Many homeowners mistakenly believe ceramic tiles are naturally waterproof, but professional guidelines clarify that correct glazing and grout selection are essential for moisture resistance.
Key considerations for successful wall tile layouts include:
- Measuring and planning your space meticulously
- Selecting appropriate substrate materials
- Choosing the right adhesive and grout
- Minimizing small tile cuts
- Centering tile patterns strategically
Pro tip: Always create a detailed layout plan on paper before starting installation, using graph paper to scale and visualize tile placement precisely.
Popular Wall Tile Patterns and Variations
Wall tiles offer an incredible range of design possibilities, transforming ordinary spaces into extraordinary visual experiences. Tile patterns encompass a wide variety of styles that can dramatically alter a room’s aesthetic, from classic arrangements to contemporary geometric designs.
Traditional wall tile layouts include several fundamental patterns that homeowners and designers frequently utilize. The classic grid pattern provides a clean, uniform look, while the staggered or offset layout creates visual interest by breaking predictable lines. Herringbone and chevron patterns introduce dynamic diagonal movements that can make spaces feel more expansive and energetic. More intricate options like Zellij geometric mosaics showcase how tile arrangements can become genuine artistic statements, drawing inspiration from cultural tile traditions that transform walls into sophisticated design elements.
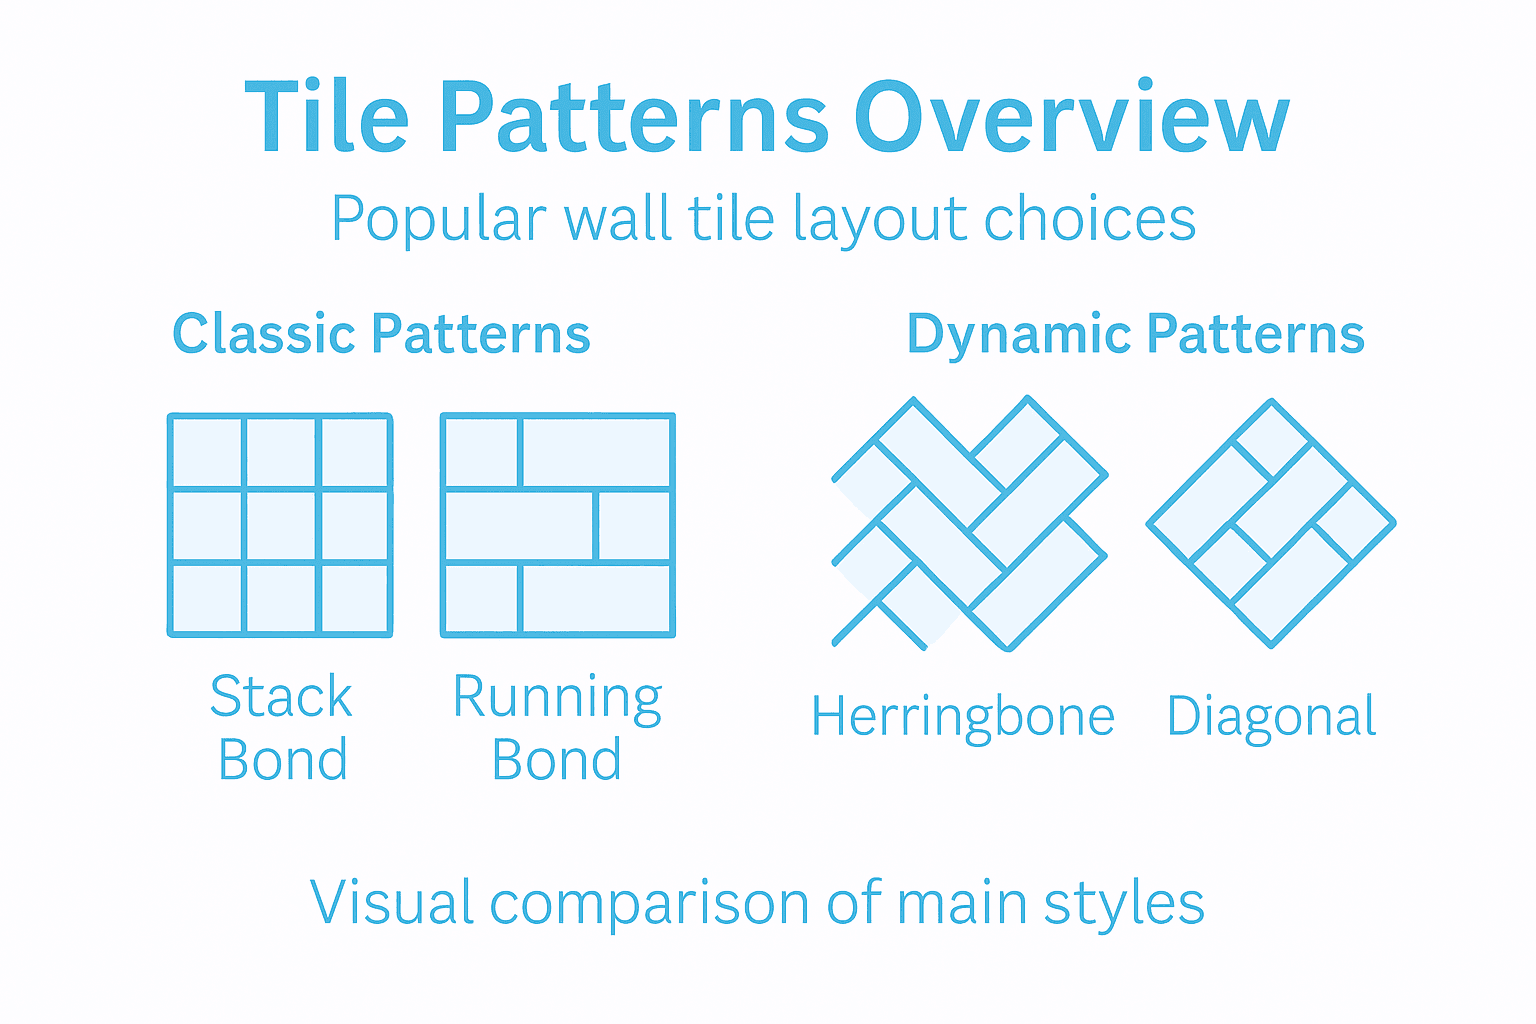
Each tile pattern communicates a unique design language. Diagonal layouts can make rooms appear larger by creating diagonal visual lines that trick the eye. Vertical stacking provides a modern, minimalist aesthetic perfect for contemporary spaces, while intricate mosaic patterns like herringbone offer texture and complexity. Homeowners can choose patterns based on their design goals:
Here’s a quick reference comparing popular wall tile layout patterns and the visual impacts they create:
| Pattern Type | Visual Effect | Best For |
|---|---|---|
| Grid | Clean and orderly look | Bathrooms, kitchens |
| Staggered/Offset | Adds movement | Subway tile walls |
| Herringbone | Dynamic and expansive | Accent walls, showers |
| Chevron | Energetic appearance | Modern living spaces |
| Mosaic | Artistic and textured | Feature walls, niches |
- Creating visual depth
- Expanding perceived room size
- Introducing architectural interest
- Matching architectural style
- Complementing existing decor
Pro tip: Order extra tiles and create a full-scale paper layout before installation to visualize how different patterns will actually look in your specific space.
Planning a Tile Layout for Your Space
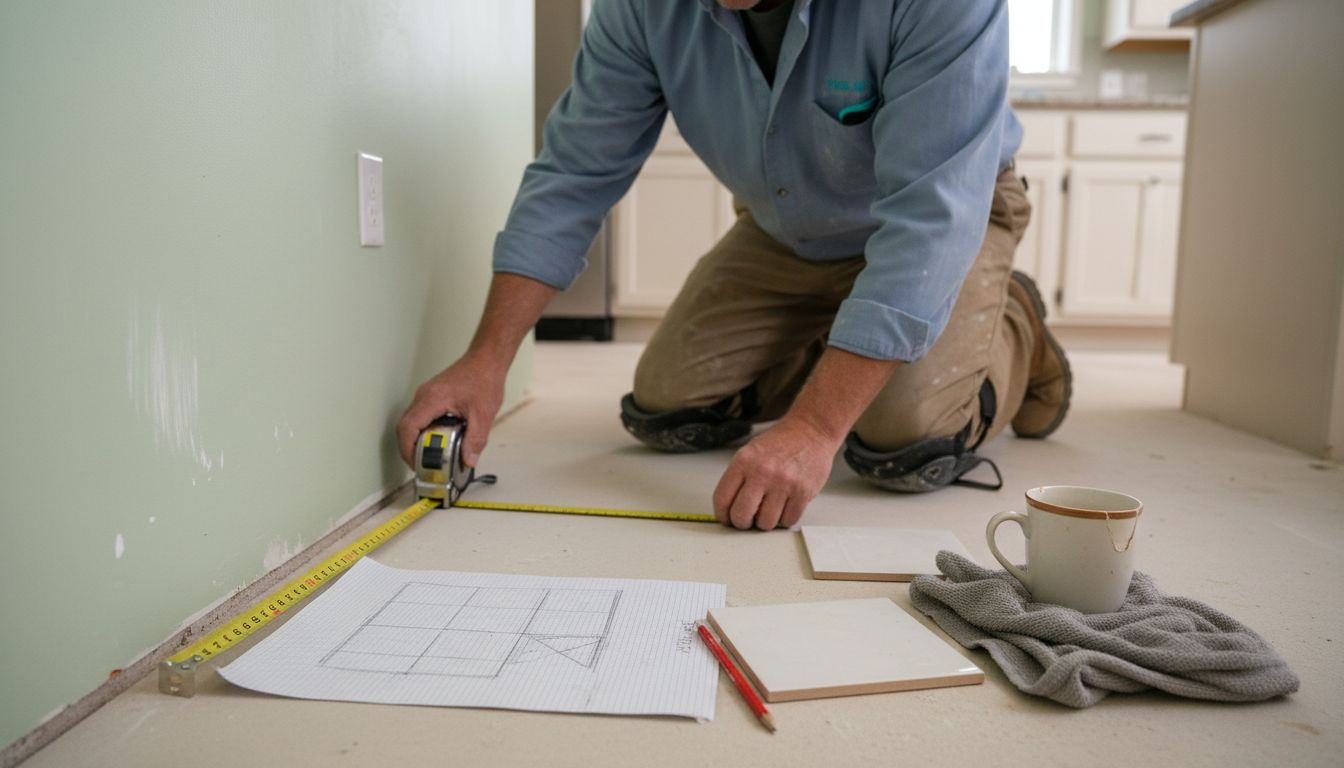
Successful wall tile installation begins with meticulous planning and strategic preparation. Tile layout preparation requires careful assessment of your space, considering factors like room dimensions, tile size, and design aesthetic that will ultimately determine the project’s success.
Professional tile installation involves several critical preliminary steps. Substrate preparation is fundamental, ensuring your wall surface is smooth, clean, and structurally sound before any tiles are placed. Wall tile installation method emphasizes the importance of precise measurements, marking reference lines, and selecting appropriate adhesive materials. Experienced installers recommend creating a detailed layout plan that accounts for:
- Exact room measurements
- Tile dimensions and pattern
- Potential obstacle locations
- Necessary cutting requirements
- Balanced tile distribution
Measuring and marking become crucial technical skills in tile layout planning. Start by finding the room’s center point and establishing horizontal and vertical reference lines. This approach helps create symmetrical tile placement, minimizing small cuts and ensuring a professional-looking final result. Consider using a laser level for absolute precision, which can dramatically improve your layout accuracy and visual appeal.
Pro tip: Always purchase 10-15% extra tiles to account for cuts, breakage, and future repairs, ensuring you have matching tiles if replacements are needed.
How Layout Affects Design and Function
Tile layout is far more than a simple aesthetic choice—it fundamentally transforms how a space functions and feels. Substrate preparation determines the entire success of a tile installation, directly impacting both visual appeal and long-term performance.
The relationship between tile layout and room functionality is intricate and nuanced. Visual continuity plays a critical role in how we perceive space, with strategic tile placement capable of making rooms appear larger, more balanced, or dramatically more dynamic. Tile installation techniques reveal that precise mortar application and tile placement are essential for creating surfaces that are not just beautiful, but structurally sound and durable.
Different layout strategies produce distinct design outcomes. Diagonal patterns can make narrow spaces feel wider, while horizontal layouts can create a sense of expansiveness. Vertical arrangements can draw the eye upward, making ceilings appear higher. Each layout choice influences room perception through visual lines and spatial relationships. Key considerations include:
The table below summarizes how tile layout choices impact both design and room function:
| Layout Strategy | Room Impact | Functional Benefit |
|---|---|---|
| Diagonal Pattern | Makes rooms appear larger | Helps conceal uneven walls |
| Horizontal Pattern | Expands perceived width | Balances long, narrow rooms |
| Vertical Pattern | Heightens space visually | Draws focus upward |
| Centered Layout | Creates symmetry | Reduces awkward cuts |
- Room dimensions
- Natural light availability
- Existing architectural features
- Desired visual effect
- Functional requirements of the space
Pro tip: Create a full-scale paper template of your proposed tile layout to preview how different patterns will interact with your specific room’s architectural elements.
Avoiding Layout Mistakes and Costly Errors
Tile installation requires precision and strategic planning to prevent expensive and frustrating errors that can compromise your entire project. Tile installation best practices provide critical guidance for homeowners and professionals alike in navigating potential pitfalls and maintaining high-quality results.
Surface preparation represents the foundational step in avoiding costly mistakes. Uneven substrates, insufficient adhesive coverage, and improper tile cutting can lead to structural failures and aesthetic disappointments. Tile layout standards emphasize strategic placement and balanced design, recommending techniques that minimize material waste and maximize visual appeal. Common errors that can derail a tile project include:
- Inadequate substrate leveling
- Incorrect adhesive application
- Poorly planned tile cuts
- Ignoring expansion joint requirements
- Inconsistent grout line spacing
Professional installers understand that meticulous planning prevents expensive rework. This means taking time to measure precisely, create detailed layout plans, and anticipate potential challenges before the first tile is placed. Checking and double-checking measurements, understanding material limitations, and having a clear vision of the final design can save significant time and money.
Pro tip: Invest in a high-quality laser level and spend extra time on initial measurements to dramatically reduce the likelihood of costly installation errors.
Elevate Your Wall Tile Layout with Expert Materials and Design Support
Choosing the right wall tile layout involves more than aesthetics. As the article highlights challenges like minimizing small cuts, ensuring balanced patterns, and preparing substrates accurately you also need dependable tile products that bring your vision to life without compromise. At TileChoices.com we understand how critical it is to have precise tile dimensions matching your desired patterns whether it is classic grid, dynamic herringbone, or artistic mosaic designs. We offer a vast selection of premium ceramic, porcelain, and natural stone tiles that support your layout goals by providing durable, high-quality materials engineered for both beauty and long-lasting performance.
Take the stress out of planning and executing your next tile project with our curated collections and expert guidance. From requesting samples for perfect color matching to accessing detailed product descriptions for informed choices we empower you to create stylish spaces confidently. Explore our website to find tiles that enhance your wall tile layout strategy and avoid common installation pitfalls discussed in the article. Start transforming your walls today by visiting TileChoices.com and discover the perfect tile solutions that align with your unique project needs.


